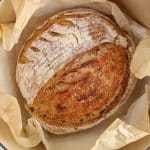
Oatmeal Sourdough Bread
This oatmeal sourdough bread is lightly sweet, tender and earthy and features a soft crumb filled with oats. The addition of rolled oats to a classic sourdough loaf makes this bread packed in extra whole-grain nutrients and it adds slightly more texture and character to your bread, too. All you need is a bubbly sourdough starter, oats, maple syrup, flour and water! Perfect loaf for breakfast or side bread for savory stews or soups.
Servings: 10 slices
Calories: 205kcal
Ingredients
For the soaker
- 100 g rolled oats thick or old-fashioned style
- 100 g water
For the bread
- 100 g active starter fed and bubbly
- 220 g water
- 50 g maple syrup or 3 tablespoons
- 10 g salt
- 400 g bread flour
Instructions
- Be sure to watch the video at the end of this recipe card to help understand the steps.
- Feed your sourdough starter about 4-8 hours before planning on mixing the dough so you have a bubbly and active starter.
Combine
- Combine the soaker ingredients (rolled oats with 100g. of water) in a medium bowl and set aside.
- In a large mixing bowl (big enough for the dough to double in size), combine the active starter, water (220g.), salt and maple syrup. Stir well until uniform. Then, add the flour and combine. You should have a shaggy ball of dough at this point.
- Cover the dough and let both the dough and soaker rest for about 20-30 minutes.
Stretch and folds
- Incorporate the soaker into the dough: I like to add it by doing some stretches and folds: add about ½ of the soaker over the dough, then grab a side of the dough and fold over, repeat going all around the dough. Then, add the other ½ of the soaker, then do more stretches and folds over. If the dough starts to feel too tight to stretch, then let it rest for 10-15 minutes before adding more of the soaker and doing more stretches.
- Once the oat mixture is mostly incorporated, then let the dough rest covered for about 30 minutes. Make 2-3 more sessions of stretches an folds with 30 minutes of rest time in between.
Bulk fermentation
- Then, cover very well (I like using plastic wrap) and let the dough rest in a cozy and warm area for 8-12 hours. The fermentation is done when the dough has doubled in size, is wiggly when shaking the bowl and looks puffy.
Shape
- Transfer the dough over a lightly floured clean surface. You can preshape the dough into a ball, then place the bowl over upside down. Rest for 15 minutes.
- Then, remove the bowl, lightly flour the top of the dough and flip the dough using a dough scraper.
- Sprinkle flour into your basket.
- Shape the bread as you wish, I chose to shape it into a batard: gently pull or stretch the dough into a rectangular on the counter and then fold the bottom part over the dough up in the middle. Then, fold both sides over as well. Grab both corners of the top part of the dough and stretch them slightly, then fold them both over the dough on their opposite side (making an X). Then, roll the dough from top to bottom. Use your fingers to seal the edges, dust the top with flour and flip the dough seam side up into your basket.
Final proof
- Cover the basket and let the dough rest for 1-3 hours (second rise or final proof).
Bake
- When almost done with the final proof, then transfer your Dutch oven (with cover) to your oven and preheat to 450º for at least 30 minutes before baking the bread.
- When ready to bake, then flip the dough over a large piece of parchment paper. Score the dough, transfer it into the preheated Dutch oven and then cover. Bake covered for 30 minutes. Then, uncover and bake for another 5-10 minutes to add color to the crust (watch closely).
- Remove the bread from the Dutch oven and let it cool completely before slicing.
Video
Notes
-
- Having a strong and active starter to make this bread is crucial! If your starter didn't double in size before using, then your bread won't rise as expected.
-
- Make sure to distribute the oats as evenly as possible into the dough. Doing a few rounds of stretch and fold will help this process.
-
- You can add some extra rolled oats to the bottom of your basket to cover the top of your loaf with oats for a nice presentation.
-
- If you prefer a thinner crust under the bread, then you can place a baking sheet under the Dutch oven.
-
- It can be hard to wait before slicing the bread, but try to be patient as the cooling down process is part of the crucial steps into making sourdough! If you slice it too early, the crumb might be gummy.
- You can shape your bread into a boule or batard, depending on the basket (or banneton) that you have. Have a peek at my short video to see how I shape mine.
- Check out this guide on how to bake your sourdough loaf without using a Dutch oven!
- Nutrition: please note that the nutritional information is an estimate per serving provided for informational purposes only (calculated by software) and accuracy is not guaranteed. Consult with your healthcare provider or a registered dietitian if you need precise nutrition calculations for health reasons.
Nutrition
Calories: 205kcal | Carbohydrates: 41g | Protein: 6g | Fat: 1g | Saturated Fat: 0.2g | Polyunsaturated Fat: 1g | Monounsaturated Fat: 0.3g | Sodium: 391mg | Potassium: 88mg | Fiber: 2g | Sugar: 3g | Vitamin A: 1IU | Calcium: 18mg | Iron: 1mg
