
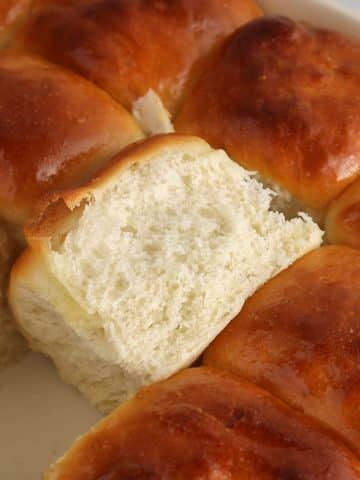
This quick sourdough discard sandwich bread is an amazing last-minute loaf you can make all on the same day. It makes for a soft and pillowy bread with a gentle crust and a delicious tang, the perfect white sandwich bread! You can use active starter OR sourdough discard to make it and it is an easy recipe everyone can make.

Most days, I prefer to slowly ferment my sourdough bread the classic way, but when life gets busy and I need a delicious sandwich loaf for our lunches quickly, then I'll whip up a batch of this sourdough discard sandwich bread.
This is a same-day quick loaf of bread made with sourdough starter or sourdough discard, but it also includes the addition of dry yeast so it can be done within a few hours.
Classic sourdough bread requires a long fermentation time to allow the wild yeast from the sourdough starter to ferment the mixture of flour and water. This makes the dough to rise and it adds a delicious sour flavor. Most classic sourdough bread recipes will need more than a day to fully ferment and make sure the bread rises nicely in the oven while baking.
But, if you are in a situation where 1- you do not have an active sourdough starter OR 2- you don't have enough time to follow a traditional sourdough schedule, then this quick and soft sourdough sandwich bread is a great recipe to keep in mind! This bread is so easy and fast!
We especially love how this easy sourdough sandwich bread still has an amazing sourdough tang flavor, even though it rises using store-bought yeast. It has an unbelievably soft and fluffy interior without big holes (tight crumb) + an easy-to-eat brown soft crust, which is great for making sandwiches.
This sourdough sandwich bread also makes for a foolproof recipe: the addition of the ready-to-use yeast helps the dough rise beautifully and effectively even when using sourdough discard and it speeds up the process, even if the conditions aren't quite perfect. This bread is perfect every time!
Looking for another same-day sourdough discard bread recipe? Check out these sourdough discard English muffins!
Hope you give it a try! ❤️

Why you will love this recipe
- The easiest sourdough bread recipe for busy families
- Ready from start to finish in under 4 hours
- Similar to a typical square white bread
- Amazing soft and pillowy texture with a gentle crust, perfect for making sandwiches
- Can be made using an active sourdough starter OR sourdough discard
- Failproof bread recipe and super simple
- Can be made without a mixer
- Delicious tang from the sourdough
- Naturally vegan recipe
Ingredients you will need
(See below in the recipe card for the measurements)
- Active sourdough starter or sourdough starter discard: I have used both a few times and the bread comes out just the same every time. You can use the unfed sourdough discard you need to get rid of before feeding your sourdough starter, which is an amazing way to avoid wasting your starter. Or use a bubbly sourdough starter.
- Dry active yeast: responsible for rising your quick bread, especially if using sourdough discard. This is because the bread schedule won't give enough time for the natural yeast to bulk ferment the mixture, meaning that the dough is going to rely on commercial yeast for rising. If you only have instant yeast, then that will work too.
- Bread flour or unbleached all-purpose flour: bread flour has a slightly higher content of protein compared to all-purpose flour, and both will work for this recipe. Usually, bread flour works better for making a rustic-style boule of sourdough that ferments slowly (higher protein supports gluten development). In this case, since we are making a speedy bread with a lighter and fluffier crumb, all-purpose flour will work too.
- Warm water: I recommend warming up your water to about 100-110º F, which helps activate the dry active yeast.
- Maple syrup: the bread isn't sweet, but adding a little maple syrup adds flavor overall and helps the yeast come to a bubbly active state.
- Salt

What type of yeast should I use?
On top of the wild yeast in the sourdough starter or sourdough discard, you will be adding some extra commercial yeast. There are mostly 2 types of ready-to-use yeast you can find everywhere: Dry active yeast (the one that I used, kept in the fridge) or Instant yeast (pantry-friendly, kept in individual packaging).
Both will work the same for this recipe, so use what you have. That being said, there is a slight difference in how to use them.
- Dry active yeast: you will have to first combine it with warm water and a little sweetener, then allow it to "bloom" or activate by letting it rest for 5-10 minutes. This is what I used, feel free to watch the quick video to see how I used it.
- Instant yeast: there is no activation step required, so you can simply toss the yeast in the bread mixture without first mixing it with the water and sweetener.
Which bread pan do I need?
I use both a classic metallic bread pan of 8.5 x 4.5 inches and also a glass (Pyrex) bread pan of the same size for this recipe, both work the same here. The exact size of your bread pan won't matter as much, but it can slightly change the shape of your final bread.
I prefer an open loaf pan as opposed to a Pullman bread loaf to allow more expansion and a nice classic dome shape.

How to make a sourdough discard sandwich bread recipe
(See below in the recipe card for the full recipe)
Activate the yeast
Weigh the water (260g) and then warm it up to about 100ºF. It is ok if it is not exact, as long as it is warm-ish and not hot.
Then, stir in the maple syrup and add the yeast. Let it sit (and bloom) for about 5-10 minutes.
Combine the bread dough
To a large bowl, add the sourdough starter or discard, then pour the activated yeast mixture. Stir well until uniform.
Add the flour and salt, and mix until mostly combined (it should be a shaggy dough at this point). I like using a dough whisk until it comes together, then I usually finish up mixing using my hands.
Cover (I like using plastic wrap so it does not dry) and let it rest for about 15-20 minutes.


Stretch and fold
Uncover and do a quick stretch and fold session: grab the opposite side of the dough in front of you, pull/stretch it up until it gets tight and then fold over the ball of dough in the bowl. Rotate the bowl 90º, then do the same by grabbing the dough also on the opposite side. Keep going around the bowl until the dough feels too tight to stretch. I usually do 4 stretches/folds per session.
Cover and let the dough rest for 30 minutes, then do another stretch and fold session if possible.


First rise (bulk fermentation)
Cover the dough and let it rise in a warm place. The dough will rise high (at least double) and quickly. It should be ready to shape after resting for 1-2 hours, depending on the temperature of your kitchen (warm kitchen means a quicker rise).
Shape in sandwich loaf + second rise (final proof)
Use a bowl scraper to transfer the dough onto a clean and lightly floured surface.
Stretch the dough into a rough rectangle and then roll the dough all the way up to shape it into a log. Use your fingers to pinch and seal the underneath seam and both edges.
Transfer into your bread pan (previously greased or covered with parchment paper) with the seam in the bottom. Cover and let the bread rise for another hour.
When almost ready to bake, then preheat the oven to 425º.
Bake
I like to score the bread with just a single line in the middle to help with expansion.
Loosely cover the top of the loaf with foil (allowing for expansion) and bake for 20 minutes. Then remove the foil and bake for another 10 minutes. The top should turn to a nice golden brown.
Let the bread cool down for a few minutes in the bread pan, then remove and let it completely cool down on a cooling rack before slicing.


Helpful tips
- If you are using instant yeast in individual sealed packaging, then you can skip blooming the yeast. Simply combine the warm water, instant yeast, maple syrup and starter or discard, then keep going with the recipe.
- You can use a freshly discarded unfed starter for making this recipe. You can also use an older discard you keep in the fridge for days at a time, although this would give you a more acidic flavor.
- Using bread flour works better in sourdough baking in general, although in this recipe, thanks to the boost from the commercial yeast, all-purpose flour should work too.
- Don't forget to add parchment paper to your bread pan (or to grease it) to be able to remove it easily.
- Try to place the foil as loosely as you can over the pan to allow expansion of the bread while baking.
- The crust will feel too hard when just out of the oven. Once cooled down completely, it will feel much softer. Be patient!
- Do not slice the loaf before it has completely cooled down or the crumb will feel too moist and will "roll" on your knife.

Storage tips
Again, don't forget to let the loaf completely cool down before slicing the bread.
Keep in an airtight container (I like using large plastic bags that I clean, dry and reuse). You can slice the whole loaf, then transfer it to the storing container for easy grab-and-go.
The bread can be kept sealed at room temperature for up to 4 days.
You can also freeze the bread (pre-slice it first) for up to 3 months.
For more information, then check how this guide on how to store sourdough bread to keep it fresh longer.

More recipes to use sourdough discard
- Sourdough granola
- Sourdough discard brownies
- Sourdough peanut butter cookies
- Sourdough carrot muffin
- Blueberry sourdough bread
I hope you like this sourdough discard sandwich bread recipe as much as we do! If you try it, please leave a comment below and rate the recipe to let me know how it was. Your feedback is so helpful!
Let's stay in touch with Instagram, Pinterest and Facebook. Also, don't forget to subscribe to my newsletter to be sure not to miss anything.
📖 Recipe

Sourdough Discard Sandwich Bread (Quick and Easy)
Ingredients
- 180 g sourdough discard or active sourdough starter
- 260 g water (warm but not hot) about 100-110ºF
- 1.5 teaspoon dry active yeast Instant yeast works too, see notes
- 2 tablespoon maple syrup
- 450 g bread flour or all-purpose flour (unbleached)
- 10 g salt
Instructions
- Combine the warm water, maple syrup and dry active yeast, then set aside to bloom for about 5 minutes.
- Add the yeast mixture to the sourdough starter in a large bowl and stir to combine. Then add the flour and salt and stir until combined (it will look shaggy at this point). Rest for 10-20 min.
- Then, perform 2 series of stretches and folds, with 30 min resting in between. How to stretch and fold: grab the dough on the opposite side of the bowl, pull it up until it cannot stretch anymore, then fold it back down on the dough. Rotate the bowl about 90º and repeat with the dough on the opposite side. Keep going until the dough is too tight to stretch (I usually do about 4 stretches per session). See the quick video at the end of this recipe card.
- Once you did 2 series of stretch and fold, then cover the bowl with plastic wrap and let it rest and rise for 1 hour (if your house is warm) or 2 to 2.5 hours (if your house is colder). The dough should double in size.
- Once doubled, transfer the dough to a lightly floured counter and shape it into a log: start by stretching the dough into a large rectangular shape, then roll it tightly from bottom to top. Use your fingers to seal the bottom and edges, then transfer into a bread pan covered with parchment paper with the seam at the bottom. Let the bread rise covered for 1 hour (final proof).
- When almost ready to bake, preheat the oven to 425º.
- Score (I like to make one opening on top), loosely cover the bread with foil (not too tight to allow expansion), then bake for 20 min. Remove the foil and bake for another 10 minutes. The top should turn to a nice golden brown.
- Once done baking, let it rest for a few minutes in the pan, then remove and let it completely cool down on a cooling rack before slicing. The crust will feel too hard once just done baking but will turn softer as it cools down. Be patient!
Video
Notes
- Storage tips: make sure the bread has completely cooled down before slicing. Keep the loaf in an airtight container or large plastic bag at room temperature for 4-5 days. You can pre-slice it for easier grab-and-go. Can also be frozen for up to 3 months.
- If using instant yeast: you can skip on blooming the yeast first. Simply combine the discard with warm water, yeast and maple syrup, then add flour and salt and keep going with the recipe.
- Nutrition: please note that the nutritional information is an estimate per serving provided for informational purposes only (calculated by software) and accuracy is not guaranteed. Consult with your healthcare provider or a registered dietitian if you need precise nutrition calculations for health reasons.

Roberta says
This bread couldn’t be easier, and the video is spot on. I’m making my second loaf today, it’s in its final rise in the bread pan. My spouse, who isn’t a fan of sourdough (I’m working on this!) tasted my first loaf and said it wasn’t as “aggressive” as sourdough. I like that about it too - it’s a great way to use starter while not being quite as tangy as full sourdough. Can’t wait to pop a piece in the toaster in the morning!
jessica says
Hi Roberta! Thanks so much for taking the time to comment! I'm so glad everyone loved it 😊
Roberta says
One note, I bake mine for 30 minutes covered then 10 uncovered.
Popping another loaf in the oven today! 🙂
jessica says
Thanks for your feedback! 😊
Anonymous says
Amazing recipe Jessica, everyone loved it. Thanks so much for sharing!
jessica says
Oh that's great! Thanks so much for sharing! 😊
Anonymous says
Amazing tasty bread. So fast to make and enjoy. Thank you
jessica says
Hi! Thanks so much for your comment, I'm glad you liked it! 😊