
These sourdough sandwich rolls are soft yet chewy and they pack a lovely sourdough flavor. They make for the perfect sandwich bread to prepare for lunches ahead of a busy week. Plus, they are easy to make! All you need is an active and bubbly sourdough starter, flour, olive oil, maple syrup, water and salt. They can be all done in just one day and they are naturally vegan.

These delicious, soft and chewy sourdough sandwich rolls will become your favorite way to make your sandwiches from now on, I am sure of it. We love making sandwiches with this whole wheat sourdough sandwich bread or this quick sourdough discard sandwich white bread, but these hoagies are such a treat, you need to give them a try!
They are absolutely irresistible!
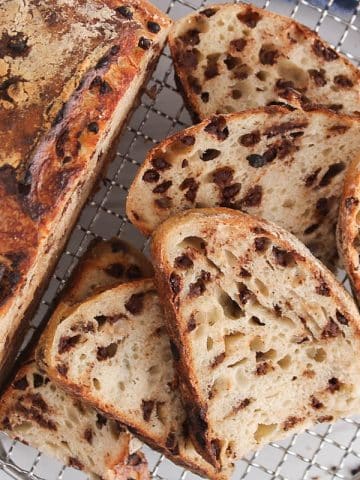
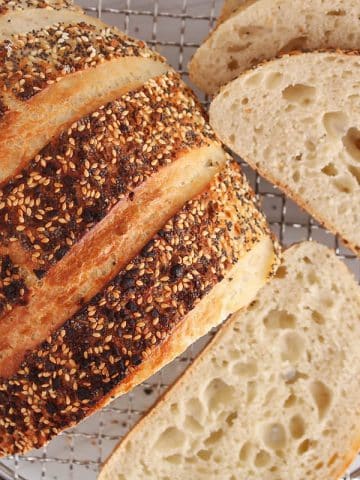
The crust is perfectly golden brown, soft and buttery with a chewy crumb. The crumb tends to be more on the tighter side without being too dense, plus there are not super large holes, making it easier to smother the sliced hoagies with mayo or your favorite sandwich spread.
You will need a sourdough starter to make them rise (no commercial yeast!), which adds tons of flavor and bonus nutrients. So much better than store-bought rolls!

You can make these sourdough hoagie rolls all on the same day! You can follow a different schedule, but here is what works for me: feed the starter in the morning, mix the dough once the starter is at peak activity (around lunchtime), let the dough ferment during the afternoon and shape it in hoagies + bake in the evening.
You can get them started the day before and bake them the next morning too, if that's easier for you.
They make for an amazing sourdough bread recipe to keep in your regular rotation and for prepping your lunches. This rustic sourdough bread and these rolls are some of the classic recipes we make every week! They are great for making sandwiches, but also, sub meatball sandwiches, side bread for salads and soups and my kids love them sliced and topped with jam for breakfast. They are so versatile, they won't last long!
For a quicker bread recipe, check out these sourdough discard soft dinner rolls!
Let me know if you gave them a try! ❤️

Why you will love this recipe
- Easy recipe: you will only need to do a few sessions of stretches and folds (no kneading) then shape and bake. Make sure to check out the video down below in the recipe card to see how I make them, it will make the whole process even easier!
- Flavor: amazing sourdough flavor without a sour taste that's too strong
- Texture: we loved their soft crumb and crust, perfect for making sandwiches!
- Healthy: as you might already know, sourdough bread is healthier compared to commercial bread you get in grocery stores. They are lower on the glycemic index, packed with gut-friendly microbiome and easier to digest than other bread.
- Shape: they make for a unique and fun way to enjoy sourdough bread with their perfect sourdough sub rolls shape.
- Made by hand: this is a recipe made without using a stand mixer!
- No yeast: all made using wild yeast from your starter! This means better flavor, better crumb and more health benefits.
- Vegan hoagie rolls: this is a naturally vegan and dairy-free recipe that's made without butter or dairy milk.

Naturally fermented sourdough sandwich rolls
Before getting started, you will need a sourdough starter.
In case you are new to sourdough bread: a sourdough starter is what contains all the healthy microbiome that will make your bread rise (yeast) and give the bread its signature tangy flavor (such as lactobacillus bacteria).
The starter replaces the typical commercial or instant yeast used to make quicker bread. This means that you will need some time to allow the bread to ferment and rise.
You can learn to make your own sourdough starter from scratch by following this guide. Don't be intimidated: although it takes time to build up an active sourdough starter ready to make bread (at least a whole week, more likely 2-3 weeks), it is actually pretty easy with limited hands-on time.

What you will need
(you can find the ingredient measurements down below in the recipe card)
- Sourdough starter: you will need a bubbly and active sourdough starter for making this bread recipe. Use your starter to mix in the dough once it reaches its peak activity, which is about 4-6 hours after you feed it.
- Bread flour: bread flour has a higher protein content compared to all-purpose flour (about 12.7 %), which helps the gluten network to develop and allows a better overall bread texture.
- Water: use warm water to mix the dough if possible. This gives a boost to the yeast and helps them ferment the bread quicker. Look for warm water, but not hot, so it does not alter the yeast activity. If you need a longer fermentation time (for example if you will be gone all day), then simply use cold water instead to avoid overfermentation.
- Maple syrup: adds flavor and also helps the dough rise by feeding the yeast (sugar boosts their activity). Adding some maple syrup can also make the crumb a little chewier, which works out well here in these sandwich rolls.
- Olive oil: some added fat softens the crumb and makes it a little tighter, something we want for sandwich rolls. There is not enough to taste it, though.
- Salt

How to make sourdough sandwich rolls
(you can find the full recipe down below in the recipe card)
Prepare the starter
Feed your starter about 4-6 hours before you want to mix the dough. Your starter is ready when lively, bubbly and has doubled (or more) in height in your jar.
Mix the dough
In a large mixing bowl, add the sourdough starter, water, maple syrup and olive oil. Use a dough whisk or regular large spoon to combine the ingredients.
Then, add the bread flour and salt and keep stirring to combine. The dough will be pretty sticky and you will need to stir for about a minute or two to get the ingredients together. You are looking for a mixture that has no visible dry spots of flour anymore. It will look like a shaggy dough at this point.
Cover well (I like using plastic wrap) and set aside for about 20-30 minutes.


Stretches and folds
Then, do 3 sets of stretches and folds with 30 minutes of resting time in between.
Here is how to do the stretches and folds: grab the dough on the opposite side of the bowl in front of you, then pull or stretch it up until it gets tight and then fold it back over the dough. Rotate the bowl 90º, then repeat. Keep going around the bowl until the dough feels too tight to stretch. I usually do 4-5 stretches/folds per session.


Bulk fermentation (first rise)
Once done with all the stretches and folds, then cover well and let the dough rest and rise. This is the bulk rise or bulk fermentation (which technically starts once you mix the dough).
The bulk fermentation can take from 3 hours to 8 hours and will widely vary depending on the temperature of your house. My house is pretty cozy, so I did a bulk fermentation in a warm place for 4-5 hours, but it might take longer for yours. The dough is done fermenting once puffy, wiggly when moving the bowl and might have doubled in size (although not necessarily).
Preshape
Once the bulk fermentation is done, then transfer the dough over a lightly floured surface (you can use a bowl scraper).
Then, divide the dough into 5 equal pieces (about 190g. each, I like to use a scale to divide it, see video). With each piece of dough, form a ball by pulling on the edges and bringing them to the center. Pinch the edges together, and place the balls with the seam side down.
Once all preshaped, then cover with a towel and let them rest for about 20-30 minutes.


Shape and second rise (final proof)
Cover a baking sheet with a piece of parchment paper.
Shape each ball of dough into a cylinder: take one ball of dough at a time, stretch it into a rough rectangle, then place it horizontally on the counter. Roll starting from the bottom to the top. Then, pinch the seam and both edges to seal the tubular dough and transfer it to the prepared baking sheet, seam side down.
Once done shaping the 5 rolls, cover them with a humid tea towel and set aside for about 1-2 hours. This is the final proof or second rise.


Score and bake
About 30 minutes before you want to bake the rolls, place an oven-safe dish in the bottom rack of your oven (such as a brownie pan or a loaf pan) and then turn on the oven to 400º. Make sure the dish you are using can handle high temperatures.
When ready to bake, boil some water. Then, uncover the rolls and brush the top of the dough with a small amount of milk (I used plain oat milk). Then score: I like to do 3 small diagonal openings.
Transfer the rolls to the oven and right away after, pour some boiling water into the preheated dish underneath (about ½-3/4 cup). Close the oven as quickly as you can to trap the steam inside the oven. For more details on this open-bake technique and to see other methods on how to create steam manually, then check out this guide on how to bake sourdough bread without a Dutch oven.
Bake for 20 minutes. Let the bread cool down on a cooling rack before slicing and enjoying with your favorite sandwich fillings!


Helpful tips
- Sourdough starter: how great the rolls will be is highly dependent on how great your starter is. You need an active and bubbly starter that's fed and mature. If your starter is weak, then the rolls won't ferment as expected and you might end up with a crumb that's too dense or that's gummy. Also, if making this recipe using a sourdough starter that was stored in the fridge for a while, then expect to need a few feedings a few hours apart to bring it back to life.
- Scale: I highly recommend weighing the ingredients for the best result. You can easily buy a scale online (they are not expensive).
- Butter: once just out of the oven, you can brush some melted butter (or vegan butter) to help soften the crust and add extra flavor.
- Soft crust: The crust of the rolls will feel hard once out of the oven, but will soften as they cool down. Storing them in an airtight container or bag will also help make their crust softer.
- Overnight proof: you can also do an overnight proof if you prefer. In that case, mix the dough ingredients at the end of the day and do your stretches and folds in the evening or just before bedtime. Then, cover well (use plastic wrap or it will dry) and let the dough ferment overnight at room temperature. The next morning: preshape, shape and bake.
- Steam: you can add more steam by spraying the rolls with water after 10 minutes. This helps have fluffier rolls.
Storage tips
Once the vegan hoagies are cooled done completely, then transfer them to an airtight container and keep them at room temperature for 4-5 days.
You can also freeze them! This is a good recipe to make a double batch, then once they are completely cooled down, transfer to a freezer-friendly bag or container and keep them in the freezer for up to 3 months. You can grab and go one at a time and let it thaw on the counter overnight.

FAQs
Why are my rolls too dense?
This can be related to a few different reasons, such as if your sourdough starter was not active enough or if the dough was overproofed or underproofed.
Be sure to wait for your starter to be super active and packed with bubbles before using, which might need a few feedings a few hours apart if your starter was kept in the fridge for a while.
Plus, have a peek at the dough while it is fermenting: when ready, it should be puffy, wiggly when moving the bowl and higher in the bowl, too. It might not have doubled in size, but it should look like a smooth ball of dough that spread out in your bowl. Allow it to ferment for longer if your house is on the colder side.
One more thing: don't skip on adding steam to your oven when baking the rolls. This keeps the crust softer for longer while baking, allowing a better expansion of the bread. I like to pour boiling water into a preheated pan when transferring the rolls, but there are other easy methods for adding steam, such as simply spraying water directly in the oven or over the rolls. This guide on how to bake sourdough bread without a Dutch oven will give you more details!
Can I make them using whole wheat flour?
I haven't tried it yet but if you do, then I would not recommend swapping more than 50% the amount of flour for whole wheat flour. If doing so, then you might need to add a little extra water if the dough feels too tight or dry.
Can I make them using sourdough discard?
No. Since we are not using commercial yeast or any other leavening agents, we are relying on an active sourdough starter to rise and puff our rolls. If using discard, then the rolls won't be fluffy and might be super dense.
More sourdough bread recipes you might like
- Quick sourdough discard sandwich bread
- Rustic sourdough bread
- Turmeric sourdough bread
- Oatmeal sourdough bread
- Sourdough chocolate bread
- Sourdough buckwheat bread
- Sourdough quinoa bread
- Sourdough onion bread
I hope you enjoyed these sourdough sandwich rolls! If you have any questions, please leave them in the comment section below. Your feedback is so helpful!
Let's stay in touch with Instagram, Pinterest and Facebook. Also, don't forget to subscribe to my newsletter to be sure not to miss anything.
📖 Recipe

Sourdough Sandwich Rolls (Hoagies)
Ingredients
- 100 g sourdough starter fed, active and bubbly
- 300 g warm water
- 40 g maple syrup
- 25 g olive oil
- 500 g bread flour
- 10 g salt
Instructions
Prepare your starter
- You will need a bubbly and active starter to make this recipe. Make sure to feed it 4-6 hours before you want to mix the dough and it might need more than one feeding if it was stored in the fridge.
Mix the dough
- In a large mixing bowl, add the active sourdough starter, warm water, maple syrup and olive oil. Stir until combined. Then, add the flour and salt and keep stirring until there are no dry spots of flour anymore (which can take 1-2 minutes). I like to start with a dough whisk, then finish up using my fingers. The dough will be very sticky and shaggy at this point.
- Cover well (use a plastic wrap if necessary) and let the dough sit for 20-30 minutes.
Stretches and fold
- Then, do 3 sessions of stretches and folds with 30 minutes of resting time in between.
- Here is how you can do them: grab the dough on the opposite side of the bowl, pull it up until it cannot stretch anymore, then fold it back down on the dough. Rotate the bowl about 90º and repeat with the dough on the opposite side. Keep going until the dough is too tight to stretch (I usually do about 4 stretches per session). Cover, rest for 30 min and repeat.
Bulk fermentation
- Once done with the stretches and folds, then cover well and place the dough in a cozy spot. Let the dough ferment and rise for 4-6 hours. How long you need to ferment the dough depends on the temperature (faster when warm). The dough is done fermenting once it looks puffy and lighter (it will rise, but won't necessarily double in size).
Pre-shape
- Divide the dough into 5 equal parts (about 190g. each). You can use the scale to make them as even as you can. Then, pre-shape them in balls by grabbing the edges and bringing them back into the middle of the dough. Pinch the edges together (will look like a dumpling!) and place them on a lightly floured counter seam side down. Cover and let them rest for 20 minutes.
Shape
- Cover a baking sheet with parchment paper.
- Take one of the balls and stretch it roughly into a rectangular. Then, place it horizontally on the counter and roll from bottom to top. Seal the edges and transfer on the prepared baking sheet, seam side down. Keep going until you are done with all the balls of dough.
- Cover with a damp tea towel and let them rise for about 1-2 hours at room temperature or a cozy spot (final proof). They won't double in size, but they will look puffier.
Bake
- About 30 minutes before you want to bake the bread, place an oven-safe dish (such as a brownie pan, make sure the dish can handle high temperatures) on the bottom rack and turn on the oven to 400º.
- When ready to bake, then boil some water and brush some milk over the rolls (I used plain oat milk). Then, score the rolls (I like to do a few diagonal openings).
- Transfer the bread to the pre-heated oven and right away and as quickly as you can without burning yourself, pour some boiling water into the pan underneath (about ¾ cup, careful for splashes and burns from the steam). Close the oven right away to trap the steam inside the oven.
- Bake for 20 minutes. Then, let the rolls cool down on a cooling rack before slicing and enjoying with your favorite sandwich fillings!
Video
Notes
- Careful with burns: you will be handling a hot oven and hot water, and some of the steam will come out of the oven, which can also burn. Make sure to use proper oven mitts that can handle high temperatures and try to keep your face as far as you can from the door when adding the boiling water.
- Storage: keep the cooled-down rolls at room temperature for 4-5 days. You can store them in an airtight bag or container so they don't dry out. You can also freeze them for up to 3 months!
- Feel free to brush some melted butter (or vegan butter) once just out of the oven. This will help soften the crust and add more flavor.
- There are a few other ways you can add some steam manually and this guide on how to bake sourdough bread without a Dutch oven will show you how.
- Make sure to check out the blog post for tons of tips and have a peek at the video for a better visual!
- Nutrition: please note that the nutritional information is an estimate per serving provided for informational purposes only (calculated by software) and accuracy is not guaranteed. Consult with your healthcare provider or a registered dietitian if you need precise nutrition calculations for health reasons.
Nutrition
Pin it for later!


Anonymous says
These are so good!!! I made them for our lunch last week, was great. I loved that I could make them all on the same day. Thanks for the recipe!!
jessica says
Oh I'm glad you loved them, thanks for taking the time to comment! 😊
Prina Patel says
After shaping can i refrigerate over nite and bake in the morning?
jessica says
Yes, I think that should work! 😊
Winnie says
I have now officially made this THREE TIMES in the last month! Absolutely delicious and they really do freeze so well. Thank you for sharing this recipe 🙂
jessica says
Hi Winnie!! Thanks so much for sharing, I'm so glad you liked them! 😊
Kathleen says
Have you ever shaped them and left them on the fridge overnight?
jessica says
Hi Kathleen! Yes, you can do a final proof in the fridge! 😊
Teresa says
I baked these Sourdough Hoagie Rolls today and they turned out GREAT! I'm so pleased with them and can't wait to try more of your recipes. I followed your recipe exactly and was glad to read that it could be refrigerated before baking, so I did put my dough in the frig after BF, before shaping, which worked very well. Thank you!
jessica says
Hi Teresa, I'm so happy it worked out well! Thanks for your comment 😊
Janice says
Can you substitute honey for the maple syrup? TIA!
jessica says
Yes, I think so!
Bobbie says
How are these so easy and so perfect ? It must be your process. Thank you ! I have really been searching for exactly these rolls .
jessica says
Thanks Bobbie, glad you like!
T.L. says
These were so easy and they came out perfect! Thank you so much!!!
jessica says
Hi! So glad you liked them, thanks for your comment! 😊
Anonymous says
Thank you for sharing this recipe. I’ve made them twice, once with maple syrup and one with honey. They turned out great both times. Thanks again.
jessica says
Hi! Thanks so much for your feedback, glad you like them! 😊
Anonymous says
Made these today! Easy and delicious.
I didn’t steam them. I brushed them with ghee in the oven. Super happy with the results.
jessica says
Great, so glad you like them! 😊
Cami says
Loved these! So good I’m wanting to have it as my sandwich bread (same flavor but less work with having to divide them in 1/5ths. What would be the difference in rise time, cooking, and anything else if I were to put them in one bread loaf pan?
jessica says
Hi Cami! So glad you liked them, thanks for your feedback! I am not sure about baking the dough in a loaf pan, I haven't tried it. If you try it, I would probably follow the same recipe but only bake it for longer, you might have to check on it a few times. Let me know if you try it, I'm curious to see if it works! 😊
Keeley says
This is an amazing recipe. I make these every 2 weeks for my son. He has a sandwhich every day and tried many recipes but this is the winner. He will not use anything else.
Thank you!
jessica says
Hi Keeley! So glad you and your son enjoy this recipe, thanks for sharing! 😊
Iris says
Could I do the first proof in the fridge? And then take them out and shape them?
jessica says
I think so! 😊