
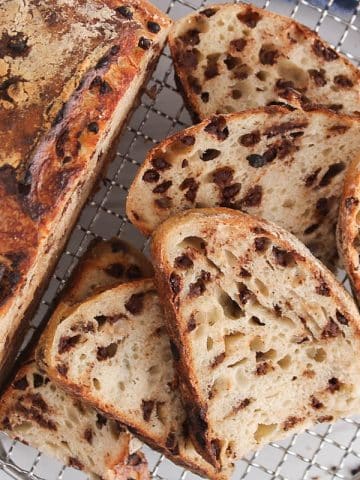
This high-protein sourdough quinoa bread is easy to make and full of delicious earthy flavor. This recipe is similar to making a classic loaf of sourdough, only this time there is some cooked quinoa mixed in the dough. This makes for a fiber-packed and protein-rich sourdough bread that's unique and versatile.

Whether you are looking to add more protein to your diet or try something new with your sourdough starter, this recipe is for you!
This is a simple sourdough bread recipe with a healthy twist that I am sure you will love. It includes the classic sourdough bread ingredients, such as starter, bread flour, a little whole wheat flour and salt, but also cooked quinoa as the star of this recipe. There is a heaping cup of cooked quinoa in this loaf, adding tons of healthy fiber, plant-based protein, vitamins and many important minerals, such as folate and iron.
This recipe isn't more complicated to prepare compared to making a rustic sourdough loaf: all you have to do is cook some quinoa, then incorporate the grain in the bread dough before the bulk fermentation. That's it!

It makes for a fluffy and soft crumb that's studded with good-for-you quinoa. The whole grain adds a mild earthy flavor that balances the tangy sourdough taste and makes the bread more filling and hearty.
Great for both savory and sweet dishes: we love it for dipping in soups or stews and also perfect for morning toast garnished with peanut butter and jam.
Let me know if you give it a try! ❤️

Baking bread with wild yeast
To make this no-yeast quinoa bread recipe, you will need to have an active and bubbly sourdough starter to rise the bread. If you are just getting started, this guide will show you how to make your own starter from scratch.
Making bread using wild yeast from a sourdough starter instead of commercial active dry yeast adds so much more flavor, texture and nutrients. But it also means that you will need more time to allow the bread dough to ferment, rise and develop the structure needed for best texture. From start to finish, you will need about 24 hours to make this bread, although most of that time is waiting for the dough to rise and ferment.

Scheduling tips
You can create your own sourdough baking schedule depending on your routine and lifestyle.
But as a guide, here is how I plan my schedule to make this recipe
- 8 am: feed the starter in the morning, it should get active by lunchtime
- 11h30: cook the quinoa + cool down (can be done in the morning too)
- 12 pm: mix the dough ingredients together (+ beginning of bulk fermentation)
- 12h30 pm: incorporate the quinoa in the dough while doing the 1st stretch and fold session
- 1 pm and 1h30 pm: stretch and fold sessions no 2 and no 3
- 1h30- 5 pm: resting time for bulk fermentation (time may vary depending on the temperature of the dough and environment)
- 5 pm: pre-shape
- 5h30 pm: shape and place in the proofing basket
- 5h30 pm - 7h00 am the next morning: cold final proof in the fridge
- 7h00 am: score and bake, then cool down before slicing
You can also do the final proof at room temperature and bake the bread on the same day. I have a same-day sourdough bread recipe showing this method.

What you will need
(more details below in the recipe card)
Tools
Most of these tools are optional, you really don't need anything fancy to make your own sourdough bread. But, if you are into baking your own sourdough and you make loaves often, then these can become very handy and make your life easier:
- Large mixing bowl: to combine the dough ingredients.
- Dough whisk: optional, but such a great tool to mix thick dough like sourdough.
- Bench scraper and bowl scraper: to lift the dough from the counter and transfer the dough from a bowl to a counter.
- Scale: essential if making sourdough bread, small kitchen scales are easy to find online and not expensive.
- Dutch oven: if you don't have one, then you can bake your sourdough loaf without a Dutch oven by following this guide.
- Parchment paper: for transferring the loaf in the Dutch oven.
- Scoring lame: for scoring the dough.
Ingredients
- Bread flour: bread flour is higher in protein compared to all-purpose flour, making it a great choice in sourdough baking to help build up the strength of the gluten. In this case, it is even more important to use bread flour since we are adding lots of quinoa, which will alter the gluten network even more.
- Whole wheat flour: adds nutrients and makes the bread a little heartier.
- Warm water: using warm water helps boost the activity of the wild yeast, shortening the fermentation length. Aim for a water temperature of about 27-29ºC.
- Active sourdough starter: you will need a very bubbly and active sourdough starter for making this bread. This means that you will need to plan ahead and feed your starter about 4-6 hours before you need it to ensure peak activity. The starter is ready to use when it has at least doubled in height in your jar.
- Quinoa: you will need ½ cup of dry quinoa for this recipe. White quinoa or colored quinoa all work well, although a colored grain will be more visible within the crumb.
- Salt

How to make high-protein sourdough quinoa bread
(full details in the recipe card below)
Prepare your starter
Make sure to feed your starter about 4-6 hours before you want to combine the dough. Use your starter once it looks active, bubbly and has at least doubled in height in the jar.
Cook the quinoa
To a small saucepan, add the dry quinoa (½ cup) and water (¾ cup), cover and bring to a simmer. Then, turn down the heat to medium and cook covered for about 15 minutes or until there is no more water in the pot. Remove from the heat and keep cover for another 5-10 minutes. Then, uncover and fluff using a fork. Let the quinoa cool down before using.
Mix the dough
In a large mixing bowl, add the active starter and warm water, then stir until uniform. Add the bread flour, whole wheat flour and salt and keep stirring until combined and you cannot see any dry spots of flour anymore.
The dough will look shaggy at this point, this is normal. Cover and let it rest for about 20-30 minutes.


Stretches and folds (+ incorporate the quinoa)
Then, do 3 sessions of stretches and folds with 30 minutes of resting time in between.
During the first stretches and folds, you will also incorporate the cooked quinoa:
Simply add the quinoa over the dough, then grab the dough on the opposite side of the bowl in front of you, pull or stretch it up until it gets tight or you can no longer pull without breaking the dough. Then fold it back and press it over the dough in the middle. Rotate the bowl 90º, then repeat. Keep going around the bowl until the dough feels too tight to stretch. I usually do 4-5 stretches/folds per session.
The quinoa will be roughly within the dough at that point, but it is ok if it does not look perfectly distributed yet since you will be doing 2 more sessions of stretches and folds about 30 minutes apart.
Bulk fermentation
Once done with the stretches and folds, then cover well with plastic wrap and let the dough rest to ferment and rise in a warm spot.
How long the dough needs to rest will depend on the temperature of the room and the temperature of your dough as well (warm temperatures help ferment the dough faster).
You can measure the temperature of your dough to guide you with how long it should be fermenting. To give you an idea, my dough was on the warmer side, about 79-80ºC, and my room was at 70ºC, so I fermented my dough for about 4 hours.
If not following your temperature, then your dough should be done fermenting when it looks puffy, with maybe some larger bubbles on top and might have risen, although not necessarily doubled. The top of the dough should look smooth, shiny and form a dome shape on top.


Pre-shape
Transfer the dough to a very lightly floured surface (don't use too much flour), then grab the edges, pull slightly and bring the dough back onto the center to roughly shape a ball. Then, flip the dough with the seam side on the counter, cover and rest for 20 minutes.
Shape
Flip the dough back with the smooth part on the counter, and stretch the dough gently to form a square.
Fold the top part over the dough to the middle, then fold each side, then grab the dough on the opposite side of you and roll until the seam side falls on the counter.
Now, tighten the ball of dough: use both your hands to grab the dough on the opposite side, and push it towards you allowing the dough to drag on the counter. Make sure there is not too much flour on the counter so there is enough tension to drag. Rotate the dough slightly and repeat. Keep going until the surface is smooth and looks tight.
I always find it hard to put into words how to shape a boule of sourdough. Make sure you check out my quick video where I show you how I do this!


Final proof
Generously flour your proofing basket, then gently flip the ball of dough with the seam side up into the basket. Cover well, and transfer into the fridge for the final proof (8-36 hours).
Bake
At least 30 minutes before you want to bake the bread, but even better 1 hour before, place your Dutch oven in the oven with the cover on and preheat the oven to 450ºF.
When the oven is really hot, then take the dough out of the fridge, flip it on a large piece of parchment paper (you can use a small board to help with this process, see the video in the recipe card). Score the dough as you wish.
Transfer the dough to the hot Dutch oven by pulling on the corners of the parchment paper, cover and bake for 30 minutes in the preheated oven.
Remove the cover, turn down the heat at 410ºF and bake for another 5-10 minutes while watching carefully. The bread is ready when golden brown on top.


Cool down
Once done baking, then let the bread completely cool down before slicing. This is an important step, do not skip or the crumb might be gummy and feel undone if slicing too early.

Baking tips
- If you have colored quinoa, such as tri-color quinoa or red quinoa, then I would recommend using this kind. If making the loaf with white quinoa, then you will barely be able to see the grain within the crumb. I think colored quinoa makes for a better look.
- Make sure not to overcook the quinoa. A little undercooked is even better! I used a little less water to cook the quinoa so it stays in shape and does not turn mushy while cooking.
- If some water is left in the saucepan after cooking the quinoa, then drain it before transferring it over the dough.
- Allow some time for the quinoa to cool down, you don't want to add the grain super hot to the dough so as not to interfere with the fermentation process. I like to start by cooking the quinoa and once done, I remove it from the heat and let it cool down while I mix the dough. By the time I am ready to do the first stretches and folds, the quinoa is cold.
- If time allows it, I highly recommend doing the last final proof in the fridge. I find it makes for a dough that rises easier and it is also easier to score a cold dough. You can cook it straight from the fridge, no need to bring it to room temperature first!

Serving suggestions
This quinoa sourdough bread has a subtle earthy and nutty flavor that goes well with both savory and sweet recipes.
It makes for a lovely bread for hearty soups and stews and is also amazing for toast with jam. Try pairing this high-protein bread with a lighter dish to complement your meal and help make you feel full for longer.
Storage tips
Sourdough bread stores well given its naturally sour crumb. Ideally, you would slice only what you need, then flip the bread on a cutting board with the sliced part down. Keep it that way for up to 2 days, depending on how dry your house is.
For longer storage, you can transfer the bread to an airtight container so it does not dry out too fast, although this will soften the crust.
You can also freeze it! In that case, pre-slice the whole loaf for easy grab-and-go and thaw on the counter for a few hours or reheat using a toaster oven.
This guide on how to store sourdough bread will help you keep your sourdough bread fresh for longer!
FAQs
Can I make this recipe if I don't have a Dutch oven?
Yes! You can do an oven bake creating your own manual steam for this recipe. Check out this easy guide on how to bake sourdough bread without a Dutch oven to see alternatives.
Can I make it using only whole wheat flour?
I haven't tried it, but I think this would make for a much denser bread. If you want, you probably could use more whole wheat flour (such as 300g. bread flour + 100g. whole wheat flour), but you might need to add a little extra water. I have a 100% whole wheat flour bread recipe you might like!

More sourdough bread recipes you might like
- Sourdough discard sandwich bread
- Sourdough chocolate bread
- Rustic sourdough bread
- Sourdough sandwich rolls
- Sourdough buckwheat bread
- Turmeric sourdough bread
- No knead sourdough bread
- Oatmeal sourdough bread
- Sourdough onion bread
I hope you enjoyed this sourdough quinoa bread recipe! If you have any questions, please leave them in the comment section below. Your feedback is so helpful!
Let's stay in touch with Instagram, Pinterest and Facebook. Also, don't forget to subscribe to my newsletter to be sure not to miss anything.
📖 Recipe

Sourdough Quinoa Bread (High-Protein)
Ingredients
- 100 g active starter
- 330-350 g warm water about 27-29ºC
- 350 g bread flour
- 150 g whole wheat flour
- 10 g salt
For the quinoa
- ½ cup dry quinoa white (hard to see in the crumb) OR colored (visible in the crumb)
- ¾ cup water
Instructions
Get ready
- Start by feeding your starter about 4-6 hours before you need it. Your starter is ready to use when bubbly and has at least doubled in height in the jar after feeding.
- Also, you can cook the quinoa ahead of time so it has enough time to cool down before incorporating in the dough. Simply combine the dry quinoa with the water in a small saucepan, cover and bring to a simmer. Then, turn the heat down to medium and let it simmer for about 15 minutes or until there is no more water in the saucepan. Remove from the heat and keep cover for 5 more minutes, then uncover and fluff the quinoa using a fork. Let it completely cool down.
Combine the dough
- In a large mixing bowl, add the active sourdough starter and the warm water (about 27-29ºC). Stir until combined.
- Add the bread flour, whole wheat flour and salt, then keep stirring until combined (it can take a few minutes). The dough will look shaggy at this point, this is normal. Cover and let it rest for 20-30 minutes.
Stretches and folds (+ incorporate the quinoa)
- Transfer the cooked quinoa over the dough and then, perform 3 series of stretches and folds. This will help strengthen the gluten network and incorporate the quinoa uniformly within the dough.
- To do the stretches and folds: grab the dough on the opposite side of the bowl, pull it up until it cannot stretch anymore, then fold it back down on the dough. Rotate the bowl about 90º and repeat with the dough on the opposite side. Keep going until the dough is too tight to stretch (I usually do about 4 stretches per session). Cover, rest for 30 min and repeat 2 more times.
Bulk fermentation
- Once done with the stretches and fold and the quinoa is well incorporated, then cover well and place in a warm area for the dough to rise and ferment. How long your dough will need to ferment depends on the temperature of your dough and the environment. My dough was a little warm, about 80ºF and my house was at 70ºF, so I fermented the dough for about 4-4h30 hours. Your dough is done fermenting when puffy, lighter and has risen (although not necessarily doubled). It should also look smooth and form a dome on top.
Pre-shape
- Transfer the dough onto a very lightly floured surface. Then, grab the corners and bring them back in the middle of the dough to roughly shape a ball. Flip the dough to have the seam side on the counter. Cover and let it rest for 20 minutes.
Shape
- Flip the dough again so the seam side is up. Stretch the dough to shape a square. Fold the top part to the middle, then fold each side over as well. Then, grab the top part, and roll it down towards you until the seam side falls on the counter.
- To tighten the boule, use both your hands to grab the top part, then gently push it towards you while allowing the dough to drag on the counter (do not use too much flour so there is some tension when dragging). Slightly rotate the ball and repeat. Keep going until the dough forms a nice boule with a tight surface.
Final proof
- Flip the dough and place it in a proofing basket with the seam side up. Cover well and let it rest in the fridge overnight (cold final proof is recommended, 5-36 hours) or at room temperature for about 2 hours if in a rush.
Bake
- At least 30 minutes before you want to bake the bread (even better an hour), place your Dutch oven in the oven and preheat to 450ºF.
- When the oven is really hot, then take the dough out of the fridge, flip it over a large piece of parchment paper and score as you wish.
- Transfer the dough to the hot Dutch oven by pulling on the sides of the parchment, cover and bake for 30 minutes. Then, uncover, turn the oven down to 410ºF and keep baking for 5-10 minutes or until the crust is golden brown.
Cool down
- Take the baked bread out of the Dutch oven and let the loaf completely cool down on a cooling rack before slicing and enjoying (at least 2 hours). This is an important step, do not skip or the crumb might be gummy!
Video
Notes
- Sourdough starter: you will need a very active and bubbly starter to make this bread. If you are just getting started, then check out this guide on how to make your own sourdough starter from scratch!
- No Dutch oven: if you don't have a Dutch oven, then check out this guide to learn how to bake sourdough bread using the open-bake method.
- Storage tips: keep the bread with its sliced part down on a cutting board for up to 48 hours. For longer storage, you can transfer to an airtight container (the crust will become softer). Do not place the bread in the fridge. For more ideas, check out this guide on how to store sourdough bread to keep it fresh for longer!
- Nutrition: please note that the nutritional information is an estimate per serving provided for informational purposes only (calculated by software) and accuracy is not guaranteed. Consult with your healthcare provider or a registered dietitian if you need precise nutrition calculations for health reasons.
Nutrition
Pin it for later!


Anonymous says
So delicious and I was surprised how easy it was!
jessica says
Thanks so much for your comment, happy to hear you liked it!