
This maple sourdough bread recipe is great for the holiday season, to make toast for breakfast or to accompany spicy stews or soups to help balance the flavor of your meal. It is just perfectly sweet and has a nice rustic chewy bite that everyone will love.

If you love making homemade bread using a sourdough starter, then you must try this maple sourdough bread recipe!
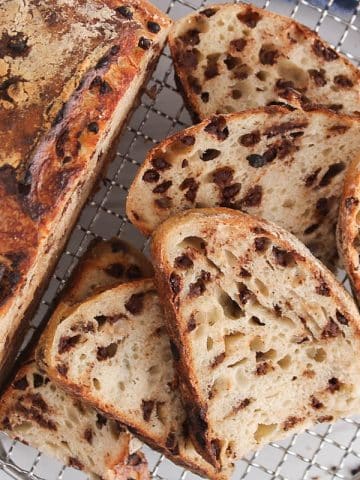
I love this oatmeal sourdough bread and this chocolate sourdough bread, or this chocolate chip sourdough bread, for their yummy sweet flavor, which are our go-to loaves to make for breakfast ahead of busy weeks. But now I wanted to come up with a sweet sourdough bread recipe that has a stronger maple syrup flavor.
This is a traditional bread recipe similar to rustic sourdough bread or regular white sourdough bread, but with nice sweet undertones coming from pure maple syrup. Great for the fall, holiday season, quick breakfasts or simply when craving something a little sweet!
Let me know if you give it a try! ❤️
Jump to:
❤️ Why you will love this recipe
- Easy and simple bread recipe
- Amazing chewy bite and it has the perfect amount of sweetness
- This artisan bread has a beautiful rustic look
- Versatile bread for morning toasts, sandwiches, spicy stews or curries
- A favorite bread recipe for kids!
🗒 Ingredient notes (+ substitutions)

- Sourdough starter: as described above, you will need a starter with 100% hydration to make this recipe. Here is a complete guide on how to make your sourdough starter from scratch.
- Bread flour: I prefer using bread flour as opposed to all-purpose flour to make rustic sourdough bread. It is higher in protein, which helps with gluten development. This gives it a nicer texture and beautiful crust! I used the bread flour from King Arthur.
- Whole wheat flour: adds an amazing flavor, a heartier texture and more fiber. Regular whole wheat or white whole wheat both work well.
- Maple syrup: use pure maple syrup for a delicious authentic flavor.
⭐️ Full list of ingredients (+ quantities) down below in the recipe card!
📝 Variations
- Pecans: add chopped pecans to your loaf for a nice crunchy texture and nutty flavor. When adding nuts to sourdough bread, I recommend incorporating them when doing the stretch and fold steps. Check out this quinoa sourdough bread and this onion sourdough bread to see how I do this (also have a peek at the quick videos at the end of each post in the recipe cards).
- Maple extract: for a stronger maple flavor, then add about 1 teaspoon of maple extract when combining the sourdough starter with the water.
⏰ Sourdough bread scheduling guide example
Here is a guide you can follow if you are just starting to make sourdough bread. You can use many other schedules, the idea is to find the one that works best for you! But here is what I like to do:
- 6-8 am: feed your starter and place it in a cozy spot (make sure you end up with a total of 100g or more)
- Noon-1 pm: check on your the starter and if it is bubbly and has risen in your jar (ideally double its height or more), then you can use it and mix the dough ingredients.
- 1-2h30 pm: 3 series of stretches and folds, ideally 20-30 minutes apart from each other.
- 2h30 pm: continue the bulk fermentation (which started right the second you combined the ingredients)
- 5-7h00 pm: if you evaluate that your dough is done fermenting, then pre-shape + shape, transfer in a proofing basket and place in the fridge for the overnight final cold-proof.
- The next morning: preheat the oven with the Dutch oven in for 30-60 minutes, score and bake. Allow 2 hours for the loaf to cool down before slicing.
🍽 How to make a maple sourdough bread
➡️ Check out the quick video down in the recipe card!

Step 1: To a large container, add the sourdough starter, water and maple syrup.

Step 2: Whisk well until combined and uniform.

Step 3: Add the bread flour, whole wheat flour and salt.

Step 4: And keep whisking until a shaggy dough forms. Cover and let the dough rest for 20 minutes.

Step 5: Then, perform 3 sessions of stretches and folds with about 30 minutes of resting time in between. To stretch, grab the dough on one edge and pull upward.

Step 4: To fold, press the dough back over the ball. Rotate the bowl about 90º then repeat. Keep going until the dough is difficult to stretch, cover and rest for 30 minutes before starting again (try to do 3 sessions total).

Step 7: Bulk fermentation: once done with the stretches and folds, then cover well and let the dough ferment for 4-8 hours (depending on the temperature of your house).

Step 8: Then, transfer the dough over a lightly floured surface and pre-shape in a ball. Rest for 20 minutes, then shape the dough as you wish (I shaped mine in a classic boule).

Step 9: Flip over the boule and place in a floured banneton or proofing basket, cover well and transfer in the fridge for the final proof (overnight or for 4-36 hours).

Step 10: At least 30 minutes before you want to bake the dough, place your Dutch oven in the oven and preheat to 450ºF. When ready to bake the bread, flip the banneton over a large piece of parchment paper and score the bread.

Step 11: Then transfer to the preheated Dutch oven. Cover and bake for 30 minutes. Then, uncover and bake for about another 5 minutes or until golden brown.
⭐️ Detailed recipe (+ video) down below in the recipe card!
💡 Helpful tips
- Make sure to use a fed, bubbly and active sourdough starter when mixing the dough ingredients. To do so, ideally you would feed your starter about 4-8 hours prior to making the dough and keep it in a cozy spot. If your starter isn't active enough when using, then the loaf won't ferment as well and the crumb might be dense and gummy.
- The bulk fermentation time is highly variable depending on the ambient temperature. I had a dough of about 77-78ºF and my house was cozy, so I let it ferment for about 5-6 hours. If your dough is colder and/or your house is chilly, then you might need to ferment for longer.
- If you want to make this loaf all on the same day, then skip the cold ferment once shaped and let it rest in the proofing basket covered for about 2 hours before baking. Check out this same-day sourdough bread recipe for inspiration!
- As seen in the video, I like to place a few ice cubes between the Dutch oven and the parchment paper, then cover right away (careful with the steam). This helps keep the crust softer for longer while baking, promoting a better rise of the loaf.

❗️ Storage tips
Make sure to completely let the loaf cool down before slicing it. Try to slice only what you need, then flip the loaf on its sliced part on the cutting board (which should hide the crumb part). The rest of the crust will keep the bread fresh for 48 hours or so.
For longer storage, you can transfer to an airtight bag or container, but know that the crust will soften in that case.
Freezing the bread is a great option if you don't enjoy it all within a few days. You can pre-slice it, transfer the slices to a freezer-friendly bag and freeze for up to 3-4 months, maybe longer. Thaw directly in a toaster or mini-toaster oven. It will taste just as good as when freshly out of the oven!
For more ideas on how you can store your loaf, check out this complete sourdough storage guide!
❓ FAQs
There are a few signs that will show you that your dough might be done fermenting, but especially, pay attention to the look of the dough. It should be puffy and should wiggle slightly when you shake the bowl. The dough should have risen in the bowl (but not necessarily doubled) and a few large bubbles might be visible on top. Also, the top surface of the dough often forms a dome in the bowl.
Actually, it is not overly sweet at all. There is a mild to moderate maple flavor and some sweet undertone, but the flavor isn't overpowering the bread.
There are different ways you can shorten the fermentation when making sourdough bread:
1- Add a few extra grams of sourdough starter when mixing the dough
2- Use warm water when combining the dough ingredients
3- Place the dough in a warm and cozy spot during bulk fermentation
4- Do a final proof at room temperature as opposed to a cold ferment to speed up the overall fermentation process.
Yes! I have a guide on how to bake sourdough bread using the Open Oven method (no Dutch oven) that you can use when making this maple sourdough bread.

🍞 More sourdough bread you might like


I hope you like this maple sourdough bread recipe as much as we do! If you try it, please leave a comment below and rate the recipe to let me know how it was. Your feedback is so helpful!
Let's stay in touch with Instagram, Pinterest and Facebook. Also, don't forget to subscribe to my newsletter to be sure not to miss anything.
📖 Recipe

Maple Sourdough Bread (with real maple syrup!)
Equipment
- Large mixing bowl with cover
- Small kitchen scale
- Dough whisk
- Dough scraper and Bench scraper
- Banneton or proofing basket with cover
- Scoring blade
- Dutch oven optional, see notes
- Parchment paper
Ingredients
- 100 g active sourdough starter 100% hydration
- 130 g maple syrup
- 220 g water
- 300 g bread flour
- 120 g whole wheat flour
- 10 g salt
Instructions
- Prep your starter: Make sure your starter was fed 4-8 hours before using. It should be looking active, bubbly and high in your jar when mixing in your dough.
- Mix the dough: In a large container, mix together the sourdough starter, water and maple syrup (I like using a dough whisk for that). Then, add the bread flour, whole wheat flour and salt and keep whisking until a shaggy dough forms. Cover and let the dough rest for 20 minutes.
- Stretches and folds: Now, perform 3 series of stretches and folds with about 30 minutes of resting time in between. To stretch and fold: grab the dough on the opposite side of the bowl, pull it up until it cannot stretch anymore, then fold it back down on the dough. Rotate the bowl about 90º and repeat with the dough on the opposite side. Keep going until the dough is too tight to stretch (I usually do about 4 stretches per session). Cover, rest for 30 min and repeat two more times.
- Bulk fermentation: Then, cover well and let the dough ferment in a cozy spot for 5-7 hours. The dough is done fermenting when puffy, looks lighter and wiggles when moving the bowl. It might also have doubled in size, although not necessarily.
- Pre-shape: Once the fermentation is done, transfer the dough over a lightly floured surface and pre-shape the dough into a ball by pulling on the edges and bringing them in the middle of the dough (press them into the dough). It might look like a dumpling! Flip the ball to place the seam down on the counter. Cover and let it rest for 20 minutes.
- Shape the dough: Flip the ball of dough back with its smooth surface on the counter and pull/stretch it to form a rectangular or square shape. Then fold the top part into the middle of the dough, then fold both sides as well on top of the dough. Then, grab the top part and roll it down until the seam is on the counter while keeping it tight. Use both your hands to drag the dough on the counter by pushing the top part of the ball towards you. Then slightly rotate the ball and repeat. The top part of the dough should tighten up and be very smooth (see video).
- Final proof: Sprinkle flour into your banneton or proofing basket and also some over the top of your ball of dough. Use a bench scraper to grab and lift the dough and flip it into the banneton so the seam side is up. Cover well and place in the fridge overnight (or for 12-36 hours, can also be done at room temperature for about 2 hours).
- Bake: At least 30 minutes before you want to bake the bread (1 hour is better), place your Dutch oven in your oven and preheat to 450ºF. When the oven is really hot, then take your proofed dough out of the fridge and flip it over a large piece of parchment paper (you can use a small board to ease the process). Score the dough as you wish and transfer it to the hot Dutch oven by pulling on the edges of your parchment paper. Cover and bake for 30 minutes. Then, uncover and bake for 5-7 minutes or until the crust is golden brown.
- Cool down: Once done baking, take the bread out of the Dutch oven. Let the bread completely cool down before slicing, or at least for 2 hours (this is an important step!). Enjoy!
Video
Notes
- If you are just getting started, then check out this guide on how to make your own sourdough starter from scratch.
- Make sure to use a fed, bubbly and active sourdough starter when mixing the dough ingredients. To do so, ideally you would feed your starter about 4-8 hours prior to making the dough and keep it in a cozy spot. If your starter isn't active enough when using, then the loaf won't ferment as well and the crumb might be dense and gummy.
- The bulk fermentation time is highly variable depending on the ambient temperature. I had a dough of about 77-78ºF and my house was cozy, so I let it ferment for about 5-6 hours. If your dough is colder and/or your house is chilly, then you might need to ferment for longer.
- If you want to make this loaf all on the same day, then skip the cold ferment once shaped and let it rest in the proofing basket covered for about 2 hours before baking. Check out this same-day sourdough bread recipe for inspiration!
- As seen in the video, I like to place a few ice cubes between the Dutch oven and the parchment paper, then cover right away (careful with the steam). This helps keep the crust softer for longer while baking, promoting a better rise of the loaf.
- If you don't have a Dutch oven, then check out this guide on how to bake sourdough bread using the Open Bake Method.
- Nutrition: please note that the nutritional information is an estimate per serving provided for informational purposes only (calculated by software) and accuracy is not guaranteed. Consult with your healthcare provider or a registered dietitian if you need precise nutrition calculations for health reasons.

Anonymous says
Just made it, so so good!
jessica says
Great, glad it worked out!
Courtney Allison Infascelli says
Question....would you be able to make this all with bread flour and if so what would the total grams be? Thank you for provide us with so many amazing vegan sourdough recipes!
jessica says
Hi Courtney! Thanks for your question, I think that if you were to only use bread flour, then you might need to add a tiny bit more of it given the fact that whole wheat flour usually absorb more moisture. I'll give a more specific amount of grams in the recipe card if I try it! 😊