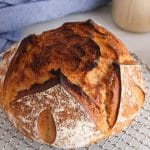
Maple Sourdough Bread (with real maple syrup!)
This maple sourdough bread recipe is great for the holiday season, to make toast for breakfast or to accompany spicy stews or soups to help balance the flavor of your meal. It is just perfectly sweet and has a nice rustic chewy bite that everyone will love.
Servings: 10 slices
Calories: 193kcal
Equipment
- Large mixing bowl with cover
- Small kitchen scale
- Dough whisk
- Dough scraper and Bench scraper
- Banneton or proofing basket with cover
- Scoring blade
- Dutch oven optional, see notes
- Parchment paper
Ingredients
- 100 g active sourdough starter 100% hydration
- 130 g maple syrup
- 220 g water
- 300 g bread flour
- 120 g whole wheat flour
- 10 g salt
Instructions
- Prep your starter: Make sure your starter was fed 4-8 hours before using. It should be looking active, bubbly and high in your jar when mixing in your dough.
- Mix the dough: In a large container, mix together the sourdough starter, water and maple syrup (I like using a dough whisk for that). Then, add the bread flour, whole wheat flour and salt and keep whisking until a shaggy dough forms. Cover and let the dough rest for 20 minutes.
- Stretches and folds: Now, perform 3 series of stretches and folds with about 30 minutes of resting time in between. To stretch and fold: grab the dough on the opposite side of the bowl, pull it up until it cannot stretch anymore, then fold it back down on the dough. Rotate the bowl about 90º and repeat with the dough on the opposite side. Keep going until the dough is too tight to stretch (I usually do about 4 stretches per session). Cover, rest for 30 min and repeat two more times.
- Bulk fermentation: Then, cover well and let the dough ferment in a cozy spot for 5-7 hours. The dough is done fermenting when puffy, looks lighter and wiggles when moving the bowl. It might also have doubled in size, although not necessarily.
- Pre-shape: Once the fermentation is done, transfer the dough over a lightly floured surface and pre-shape the dough into a ball by pulling on the edges and bringing them in the middle of the dough (press them into the dough). It might look like a dumpling! Flip the ball to place the seam down on the counter. Cover and let it rest for 20 minutes.
- Shape the dough: Flip the ball of dough back with its smooth surface on the counter and pull/stretch it to form a rectangular or square shape. Then fold the top part into the middle of the dough, then fold both sides as well on top of the dough. Then, grab the top part and roll it down until the seam is on the counter while keeping it tight. Use both your hands to drag the dough on the counter by pushing the top part of the ball towards you. Then slightly rotate the ball and repeat. The top part of the dough should tighten up and be very smooth (see video).
- Final proof: Sprinkle flour into your banneton or proofing basket and also some over the top of your ball of dough. Use a bench scraper to grab and lift the dough and flip it into the banneton so the seam side is up. Cover well and place in the fridge overnight (or for 12-36 hours, can also be done at room temperature for about 2 hours).
- Bake: At least 30 minutes before you want to bake the bread (1 hour is better), place your Dutch oven in your oven and preheat to 450ºF. When the oven is really hot, then take your proofed dough out of the fridge and flip it over a large piece of parchment paper (you can use a small board to ease the process). Score the dough as you wish and transfer it to the hot Dutch oven by pulling on the edges of your parchment paper. Cover and bake for 30 minutes. Then, uncover and bake for 5-7 minutes or until the crust is golden brown.
- Cool down: Once done baking, take the bread out of the Dutch oven. Let the bread completely cool down before slicing, or at least for 2 hours (this is an important step!). Enjoy!
Video
Notes
- If you are just getting started, then check out this guide on how to make your own sourdough starter from scratch.
- Make sure to use a fed, bubbly and active sourdough starter when mixing the dough ingredients. To do so, ideally you would feed your starter about 4-8 hours prior to making the dough and keep it in a cozy spot. If your starter isn't active enough when using, then the loaf won't ferment as well and the crumb might be dense and gummy.
- The bulk fermentation time is highly variable depending on the ambient temperature. I had a dough of about 77-78ºF and my house was cozy, so I let it ferment for about 5-6 hours. If your dough is colder and/or your house is chilly, then you might need to ferment for longer.
- If you want to make this loaf all on the same day, then skip the cold ferment once shaped and let it rest in the proofing basket covered for about 2 hours before baking. Check out this same-day sourdough bread recipe for inspiration!
- As seen in the video, I like to place a few ice cubes between the Dutch oven and the parchment paper, then cover right away (careful with the steam). This helps keep the crust softer for longer while baking, promoting a better rise of the loaf.
- If you don't have a Dutch oven, then check out this guide on how to bake sourdough bread using the Open Bake Method.
- Nutrition: please note that the nutritional information is an estimate per serving provided for informational purposes only (calculated by software) and accuracy is not guaranteed. Consult with your healthcare provider or a registered dietitian if you need precise nutrition calculations for health reasons.
Nutrition
Calories: 193kcal | Carbohydrates: 41g | Protein: 5g | Fat: 1g | Saturated Fat: 0.1g | Polyunsaturated Fat: 0.4g | Monounsaturated Fat: 0.1g | Sodium: 391mg | Potassium: 103mg | Fiber: 2g | Sugar: 8g | Vitamin A: 2IU | Calcium: 24mg | Iron: 1mg