
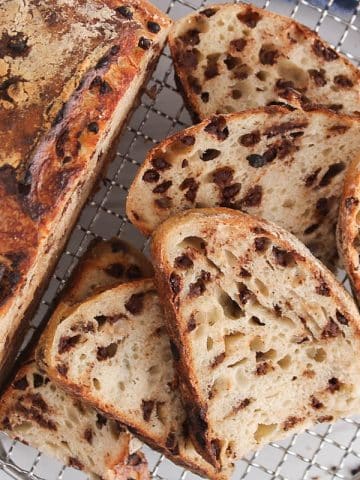
This amazing sourdough chocolate bread is the ultimate treat if you love to make naturally fermented bread using a sourdough starter. It is chewy, lightly sweet, packed with rich chocolate flavor and studded with dark chocolate chips. Perfect homemade sourdough bread for breakfast, snacking or even as a light dessert!

This is one of my family's favorite sourdough bread recipes; for an obvious reason, it is packed with chocolate!
This easy sourdough chocolate bread is a must-try if you love sourdough baking. It is soft and earthy, with a perfect amount of chocolate flavor, without being overly sweet. The occasional chunk of dark chocolate within the crumb is so amazing and keeps us wanting for more. And the nice dark crust is addictive and nicely chewy.
Just like my oatmeal sourdough bread or this chocolate chip sourdough bread, this double chocolate sourdough loaf makes for a delicious bread for breakfast or brunch. I bet this bread will disappear in no time. Just a little butter over a warm slice, and the chocolate will melt in your mouth!
And it is pretty easy to make! All you need is your active starter, flour + water, cacao powder and a little sweetener. Then, incorporate some chocolate chips into the dough. I used maple syrup to give a deep caramel-like flavor, which pairs beautifully with the chocolate flavor.
Let me know if you give it a try! ❤️

Why you will love this recipe
- Flavor: Packed with yummy rich dark chocolate flavor and studded with sweet chocolate chips. Just like in these sourdough vegan brownies, the combination of tangy sourdough flavor with the rich chocolate taste is unbelievable!
- Texture: Features a soft crumb with a crusty exterior.
- Simple recipe: Easy to make and features a series of stretches and folds instead of having to knead the dough.
- Unique bread: Perfect loaf for breakfast or brunch. Also, a great everyday bread if you love sweets, but also a great recipe for special occasions, such as Easter, Mother's Day, Valentine's morning, birthdays, etc.
- Naturally vegan!

What you will need
- Active sourdough starter: you will need a bubbly and mature starter to make this loaf. If you do not use your starter every day or if using it from the fridge, then you will have to plan ahead and build up a starter that's active enough to make a loaf.
- Bread flour: I recommend using bread flour as opposed to all-purpose flour for making this loaf because of its higher content of protein, which helps build a stronger gluten network.
- Raw cacao powder: responsible for the delicious chocolatey flavor! I used raw cacao powder, not cocoa powder, since it is less refined, although both will work fine.
- Dark chocolate chips: I used the dark chocolate chunks from the brand Enjoy Life, but you can simply use your favorite brand.
- Maple syrup: works very well with the chocolate flavor.
- Water + salt
Equipment
You don't need anything fancy to make bread at home, but if you make sourdough bread often, then there are some tools that can be very handy. Here is what I like to use when making sourdough bread:
- Scale: you will need to weigh the ingredients for making the dough. Small scales for usage at home aren't expensive and very helpful.
- Bowl scraper: used to scrape the dough out of your bowl when transferring on the counter, but also can be used to mix the dough!
- Counter scraper: helps grab the dough for gently transferring in the banneton.
- Dough whisk: I like to mix the dough using it in the initial step.
- Dutch oven: amazing vessel to bake sourdough bread at home as it traps the moisture and steam to ensure proper baking.
- Parchment paper: for transferring the loaf and baking in the Dutch oven.
- Banneton (or proofing basket): not essential, but amazing for the final proof.
- Lame: or scissors, to score the dough. In a pinch, use a sharp knife.

Get your sourdough starter ready to make bread
Depending on how much bread you make on a regular basis, you might need to take some time to build up your sourdough starter to an active state. That means discarding + feeding it until it rises consistently in your jar.
Especially if your starter has been hanging out in the fridge for a little while, then expect to need a few feedings every 12 hours or so to bring it back to an active state ready to make some bread.
And if you are completely new to making sourdough bread, then check out this complete guide on how to make your own sourdough starter from scratch!

How to make sourdough chocolate bread
(Keep scrolling down for the full recipe)
Combine the dough
In a large mixing bowl, combine the active bubbly starter, water and maple syrup. Use a dough whisk if that's easier.
Then, add the flour, cacao powder and salt. Keep stirring to combine the dough until there are no dry spots of flour anymore. You will have to stir for a few minutes and feel free to use your hands at some point to ensure the dough is as uniform as you can. It will look like a shaggy dough that's sticky.
Cover and set aside for 20-30 minutes.
Stretch and fold (+ add chocolate chips)
Then, perform 3-4 sets of "stretch and fold" every 20-30 minutes right into the bowl.
Before doing the first stretches and folds, add the chocolate chips to the bowl and incorporate them within the dough while doing the stretches.
Stretch and fold technique: grab the dough on the opposite side of the bowl in front of you, then pull or stretch it up until it gets tight and then fold it back over the dough. Rotate the bowl 90º, then repeat. Keep going around the bowl until the dough feels too tight to stretch. I usually do 4-5 stretches/folds per session.


Bulk fermentation
Once you are done with the stretches and folds, then cover very well (a piece of plastic wrap is good for that) and let the dough rise and ferment for 4-8 hours in a warm spot.
The fermentation time widely varies depending on the temperature of your house. For a quicker fermentation, then aim for a warmer temperature. For a longer fermentation, then keep the dough a little colder. You can adapt this recipe depending on your personal schedule!
The dough is ready when slightly puffy or overall looks lighter. The dough should almost double in size, although could be ready before that.
Pre-shape
When done fermenting the dough, then use your bowl scraper to transfer it over a very lightly floured clean work surface.
Fold each "corner" of the floppy dough over itself to roughly create a ball (that will look like a dumpling!), then flip with the seam side down. Cover with plastic and let the dough rest for about 20 minutes.
Shape + final proof (second rise)
I find this section difficult to put into words and easier to understand by watching someone do it. So, if you are new to sourdough baking, then you can watch my video in the recipe card and see how I do it myself. Or, search for "shaping sourdough into boule" on the internet to have a better visual.
Flip the ball of dough back with the seam side up and gently press or stretch the dough into a small square. Flip the top part over the dough right in the middle, then flip each side in the middle of the dough as well. Then finish folding by grabbing the top and rolling the dough down, and placing the seam on the counter.
"Tighten" the structure of the bread by gently pushing the ball of dough towards you using both hands allowing it to drag on the counter as you go. Rotate the dough slightly and repeat. Keep going a few times until the top part of the boule feels tighter and you have a dough that's into a round shape. Sprinkle some flour over the top of the dough.
Use your bench scraper to flip the dough into a floured banneton with the smooth side down and seam side up, then cover.
Let the dough do a final fermentation for about 2 hours at room temperature, but if time allows it, then I recommend doing your cold final proof in the fridge overnight.
Score + Bake
If doing a cold final proof, then you can bake the bread the next day.
At least 30 minutes (60 minutes is even better) before you want to bake the bread, place a large Dutch Oven in the oven with its cover on and preheat to 450º.
As a side note, you can bake your bread following the open-bake method if you do not have a Dutch oven dish.
When the oven is warm enough, then flip the proofed loaf on a piece of parchment paper (I like to use a small board to help with this process) and score the dough as you wish.
Transfer to the preheated Dutch Oven by pulling on the corners of the parchment paper, cover and bake for 30 minutes.
Remove the cover and keep cooking for about 5-7 minutes to help the crust get more color and turn crunchier (watch carefully).


Cool down
Once down baking, remove the loaf from the Dutch oven and place it on a cooling rack. Let the dough completely cool down before slicing and enjoying. This is an important step: the crumb can still be gummy when just out of the oven and need to cool down to finish cooking and allow the moisture to redistribute properly.
Helpful tips
- The success of your sourdough bread is going to depend on many factors, but one of the most important ones is having a mature, active and bubbly sourdough starter. If your starter is dull or not mature enough, then your loaf won't rise as much and you might end up with an underproofed loaf.
- I highly recommend using bread flour for making this recipe. There is some cacao powder (which might change the pH of the loaf) and some chocolate chips, which can interfere with the strengthening process of the sourdough loaf. To help have a "strong" bread, then use a high-in-protein flour, such as bread flour.
- To speed up the fermentation process, you can also use warm water when mixing up the dough. Also keeping your dough in a cozy spot will allow the yeast to ferment quicker.
- Cold ferment: doing the final proof in the banneton in the fridge overnight (or up to 36 hours) allows for a tangier bread, but also helps the scoring process and encourages oven spring (bread rising upward instead of towards the sides).
- Storage: once cooled down, then keep at room temperature cut side down on the cutting board for up to 2 days, then transfer into an airtight container or freeze. This guide on how to store sourdough bread will give you more tips on how to keep your bread fresh.

Variations
This tangy yet sweet sourdough chocolate bread is absolutely perfect on its own! But you can include some more fun additions or tweak some of the ingredients depending on your taste. Here are a few ideas:
- Chocolate: you can use different kinds of chocolate to make this bread. We love the allergen-free dark chocolate chunks from the brand Enjoy Life, but simply use your favorite one. White chocolate would be super fun here, and feel free to go for semi-sweet chips, sweeter chocolate chips or even peanut butter chips.
- Fruit: dried cherries and dried blueberries would be a treat here paired with the chocolate.
- Nuts: add a handful of chopped walnuts or pecans to your loaf when incorporating the chocolate.
- Spices: a generous pinch of cinnamon, nutmeg or pumpkin spice mix would add more flavor.
Serving suggestions
We love this bread for breakfast: it is earthy, nourishing and keeps us full all morning. But also, it feels like a yummy treat! You can toast it so the chocolate melts slightly, then smother with butter (we use vegan butter). Amazing with a cup of coffee or a glass of creamy oat milk.
It can also turn into a light yet filling dessert, simply with butter or even ice cream. You can try topping with sliced strawberries or bananas and cover with fruit jam. Delicious!

More bread recipes you might like
- Quick sourdough sandwich bread
- Turmeric sourdough bread
- Sourdough buckwheat bread
- Oatmeal sourdough bread
- Rustic sourdough bread
- Sourdough sandwich rolls
I hope you like this sourdough chocolate bread recipe as much as we do! If you try it, please leave a comment below and rate the recipe to let me know how it was. Your feedback is so helpful!
Let's stay in touch with Instagram, Pinterest and Facebook. Also, don't forget to subscribe to my newsletter to be sure not to miss anything.

📖 Recipe

Sourdough Chocolate Bread
Equipment
- Dutch oven
Ingredients
- 100 g sourdough starter active and bubbly
- 380 g warm water
- 60 g maple syrup
- 500 g bread flour
- 50 g cacao powder cocoa powder works too
- 10 g salt
- 100 g dark chocolate chips
Instructions
- Note #1: You will need an active and bubbly sourdough starter before mixing the dough together. If necessary, plan ahead and feed your starter until it rises consistently in your jar. Check out this sourdough starter guide if you are just getting started!
- Note #2: Scheduling: I like to feed my starter early morning, mix the dough at around lunchtime, ferment it during the afternoon and shape it early evening. Then, I like to do the final proof all night in the fridge and bake the next morning. This is what works for me, but you can adjust this schedule to your needs!
Combine the dough
- Add the active and bubbly sourdough starter, warm water, and maple syrup to a large mixing bowl. Stir until combined. Then, add the flour, cacao powder and salt. Stir to combine. I like to start with a dough whisk, then use my hands. Keep stirring until there are no dry pockets of flour anymore, which can take a few minutes. The dough will be very sticky and look shaggy. Cover and let it rest for 20 minutes.
Stretches and folds (+ add chocolate chips)
- Add the chocolate chips over the dough and then, perform 3-4 series of stretches and folds (the chocolate chips will be incorporated into the dough as you do them).
- To stretch and fold: grab the dough on the opposite side of the bowl, pull it up until it cannot stretch anymore, then fold it back down on the dough. Rotate the bowl about 90º and repeat with the dough on the opposite side. Keep going until the dough is too tight to stretch (I usually do about 4 stretches per session). Cover, rest for 30 min and repeat.
Bulk fermentation
- Once done with the stretches and folds, then cover well (use plastic wrap if possible so the dough doesn't dry). Let the dough rise and ferment for 4-8 hours. The dough will rise faster in a warm spot. It is done fermenting when it looks puffy or lighter and might have doubled in size (although not necessary).
Preshape
- When done fermenting, use a bowl scraper to transfer the dough over a lightly floured working surface. Grab the corners of the dough and flip them over the top to form a rough round shape (it might look like a dumpling!). Flip the dough seam side down on the counter, cover and let it rest for 20 minutes.
Shape
- During resting time, generously flour your banneton or proofing basket.
- Then, flip the dough back with the seam side up. Shape the dough into a small-medium square/rectangular shape. Then, fold the top part over the dough to the middle of the square, then flip each side over the dough as well. Grab the top part, and roll it over itself until the seam side is down on the counter.
- Then, tighten the dough: use both your hands to push the ball of dough towards you allowing it to drag on the counter. Slightly rotate the dough and repeat a few times until the dough is round with a tight/smooth surface.
- Use a counter scraper to gently flip the dough into your floured banneton seam side up.
Finale proof
- Cover the banneton very well with plastic wrap and place in the fridge. Proof overnight (or for 12-36 hours).
Score + Bake
- The next morning, you can bake the dough. At least 30-60 minutes before you want to bake it, transfer your Dutch Oven into the oven and preheat to 450º.
- When the oven is warm enough, then take the dough out of the fridge, and flip the banneton over a piece of parchment paper (I like to use a small board to help with this process).
- Score the dough as you wish, and pull on the corners of the parchment paper to transfer into the hot Dutch Oven. Cover and bake for 30 minutes. Then, uncover and bake for 5-7 minutes extra or until the crust has a nice color (watch carwefully).
Cool down
- It is important to let the bread completely cool down before slicing or the crumb might end up gummy. This can take about 2-3 hours.
Video
Notes
- Storage: keep the bread at room temperature for up to 4-5 days. If you pre-slice the bread, then make sure to keep it in an airtight container so they don't dry out too fast. Ideally, do not slice the whole boule all at once, but instead, slice what you need and flip the remaining bread with the sliced part down on a cutting board. More details on how to keep your sourdough bread fresh here!
- Make sure to read the blog post where I share more details on how to make this recipe!
- If you do not have a Dutch oven dish, then this sourdough open-bake guide will show you how to bake your bread!
- Nutrition: please note that the nutritional information is an estimate per serving provided for informational purposes only (calculated by software) and accuracy is not guaranteed. Consult with your healthcare provider or a registered dietitian if you need precise nutrition calculations for health reasons.
Nutrition
Pin it for later!


Anonymous says
Made it yesterday and just had a slice this morning, so delicious!! I'm super happy with it, will make it again!
jessica says
So glad to hear that. Thanks for taking the time to comment!