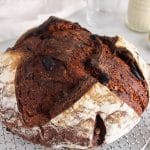
Sourdough Chocolate Bread
This amazing sourdough chocolate bread is the ultimate treat if you love to make naturally fermented bread using a sourdough starter. It is chewy, lightly sweet, packed with rich chocolate flavor and studded with dark chocolate chips. Perfect homemade sourdough bread for breakfast, snacking or even as a light dessert!
Servings: 12 slices
Calories: 226kcal
Equipment
- Dutch oven
Ingredients
- 100 g sourdough starter active and bubbly
- 380 g warm water
- 60 g maple syrup
- 500 g bread flour
- 50 g cacao powder cocoa powder works too
- 10 g salt
- 100 g dark chocolate chips
Instructions
- Note #1: You will need an active and bubbly sourdough starter before mixing the dough together. If necessary, plan ahead and feed your starter until it rises consistently in your jar. Check out this sourdough starter guide if you are just getting started!
- Note #2: Scheduling: I like to feed my starter early morning, mix the dough at around lunchtime, ferment it during the afternoon and shape it early evening. Then, I like to do the final proof all night in the fridge and bake the next morning. This is what works for me, but you can adjust this schedule to your needs!
Combine the dough
- Add the active and bubbly sourdough starter, warm water, and maple syrup to a large mixing bowl. Stir until combined. Then, add the flour, cacao powder and salt. Stir to combine. I like to start with a dough whisk, then use my hands. Keep stirring until there are no dry pockets of flour anymore, which can take a few minutes. The dough will be very sticky and look shaggy. Cover and let it rest for 20 minutes.
Stretches and folds (+ add chocolate chips)
- Add the chocolate chips over the dough and then, perform 3-4 series of stretches and folds (the chocolate chips will be incorporated into the dough as you do them).
- To stretch and fold: grab the dough on the opposite side of the bowl, pull it up until it cannot stretch anymore, then fold it back down on the dough. Rotate the bowl about 90º and repeat with the dough on the opposite side. Keep going until the dough is too tight to stretch (I usually do about 4 stretches per session). Cover, rest for 30 min and repeat.
Bulk fermentation
- Once done with the stretches and folds, then cover well (use plastic wrap if possible so the dough doesn't dry). Let the dough rise and ferment for 4-8 hours. The dough will rise faster in a warm spot. It is done fermenting when it looks puffy or lighter and might have doubled in size (although not necessary).
Preshape
- When done fermenting, use a bowl scraper to transfer the dough over a lightly floured working surface. Grab the corners of the dough and flip them over the top to form a rough round shape (it might look like a dumpling!). Flip the dough seam side down on the counter, cover and let it rest for 20 minutes.
Shape
- During resting time, generously flour your banneton or proofing basket.
- Then, flip the dough back with the seam side up. Shape the dough into a small-medium square/rectangular shape. Then, fold the top part over the dough to the middle of the square, then flip each side over the dough as well. Grab the top part, and roll it over itself until the seam side is down on the counter.
- Then, tighten the dough: use both your hands to push the ball of dough towards you allowing it to drag on the counter. Slightly rotate the dough and repeat a few times until the dough is round with a tight/smooth surface.
- Use a counter scraper to gently flip the dough into your floured banneton seam side up.
Finale proof
- Cover the banneton very well with plastic wrap and place in the fridge. Proof overnight (or for 12-36 hours).
Score + Bake
- The next morning, you can bake the dough. At least 30-60 minutes before you want to bake it, transfer your Dutch Oven into the oven and preheat to 450º.
- When the oven is warm enough, then take the dough out of the fridge, and flip the banneton over a piece of parchment paper (I like to use a small board to help with this process).
- Score the dough as you wish, and pull on the corners of the parchment paper to transfer into the hot Dutch Oven. Cover and bake for 30 minutes. Then, uncover and bake for 5-7 minutes extra or until the crust has a nice color (watch carwefully).
Cool down
- It is important to let the bread completely cool down before slicing or the crumb might end up gummy. This can take about 2-3 hours.
Video
Notes
- Storage: keep the bread at room temperature for up to 4-5 days. If you pre-slice the bread, then make sure to keep it in an airtight container so they don't dry out too fast. Ideally, do not slice the whole boule all at once, but instead, slice what you need and flip the remaining bread with the sliced part down on a cutting board. More details on how to keep your sourdough bread fresh here!
- Make sure to read the blog post where I share more details on how to make this recipe!
- If you do not have a Dutch oven dish, then this sourdough open-bake guide will show you how to bake your bread!
- Nutrition: please note that the nutritional information is an estimate per serving provided for informational purposes only (calculated by software) and accuracy is not guaranteed. Consult with your healthcare provider or a registered dietitian if you need precise nutrition calculations for health reasons.
Nutrition
Calories: 226kcal | Carbohydrates: 42g | Protein: 7g | Fat: 4g | Saturated Fat: 3g | Polyunsaturated Fat: 0.3g | Monounsaturated Fat: 0.3g | Cholesterol: 0.1mg | Sodium: 334mg | Potassium: 169mg | Fiber: 3g | Sugar: 6g | Vitamin A: 2IU | Vitamin C: 0.04mg | Calcium: 42mg | Iron: 1mg