
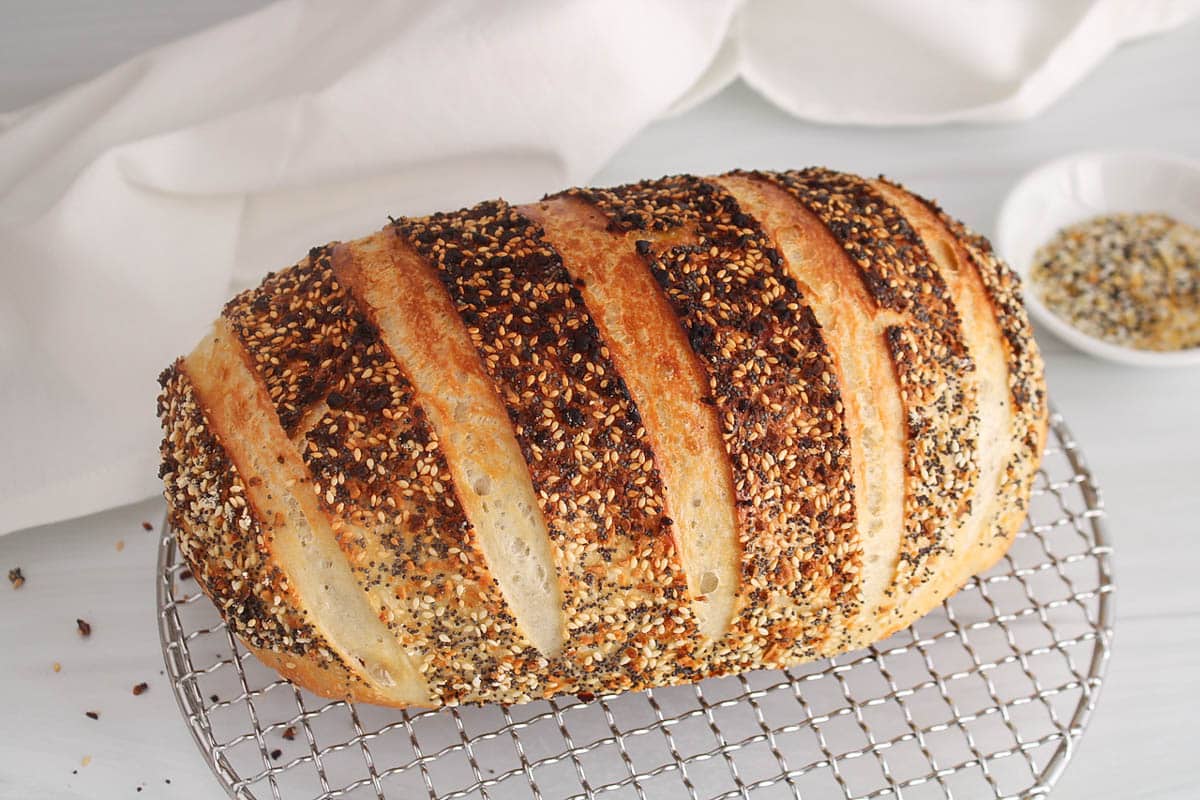
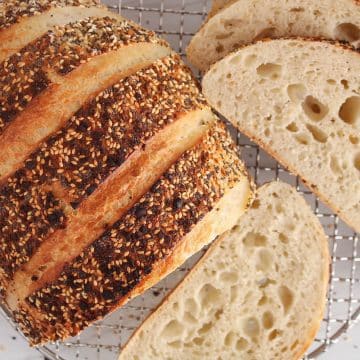
This everything bagel sourdough bread recipe is just as delicious as classic savory sourdough everything bagels, but in the shape of a sliceable bread! It is a simple and easy sourdough recipe, with much quicker and approachable steps than making bagels, but perfect if you want big flavors without the extra work. Makes for the best morning toast and sandwiches, where every slice is packed with irresistible everything bagel-goodness!
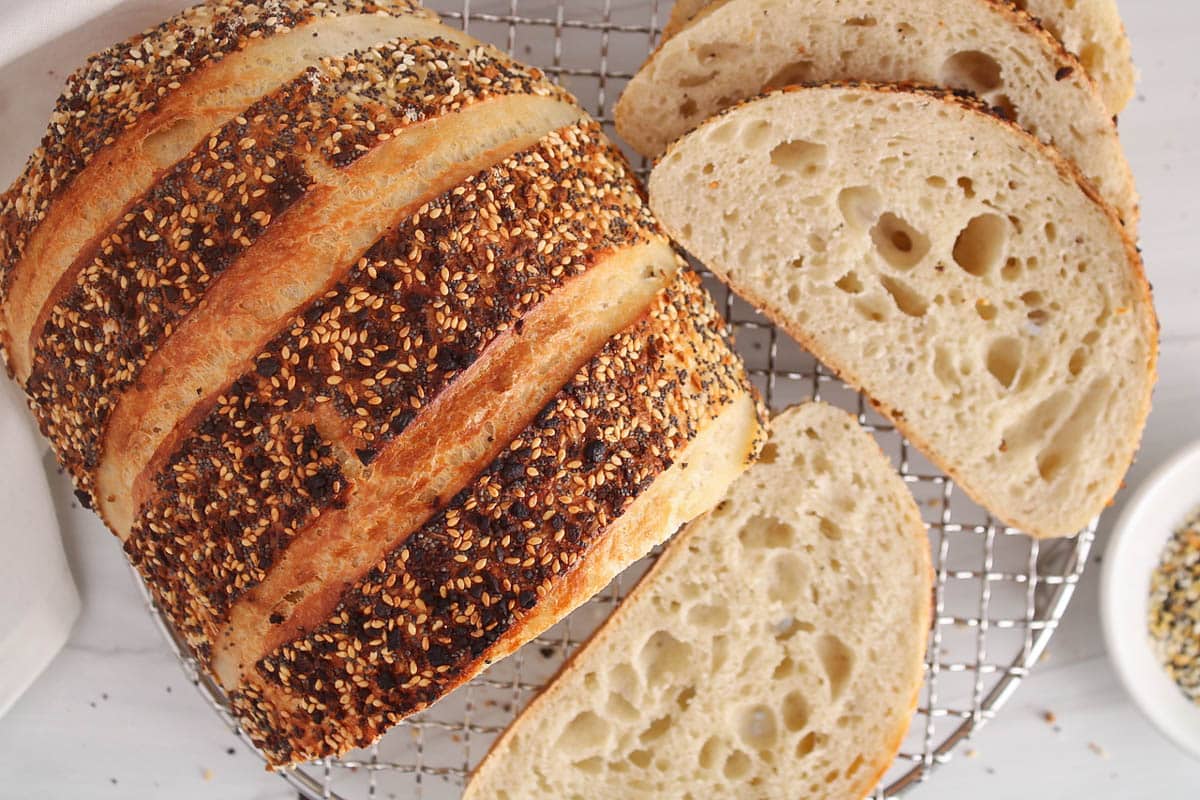
When you feel like eating everything sourdough bagels, but want an easier, no-fuss baking process, then this everything bagel sourdough bread recipe is exactly what you need!
It is a simple sourdough bread recipe, very similar to this sourdough bread for beginners, but garnished with everything bagel seasoning for a yummy, classic savory flavor. It will definitely remind you of everything bagels, but in a simple and sliceable loaf!
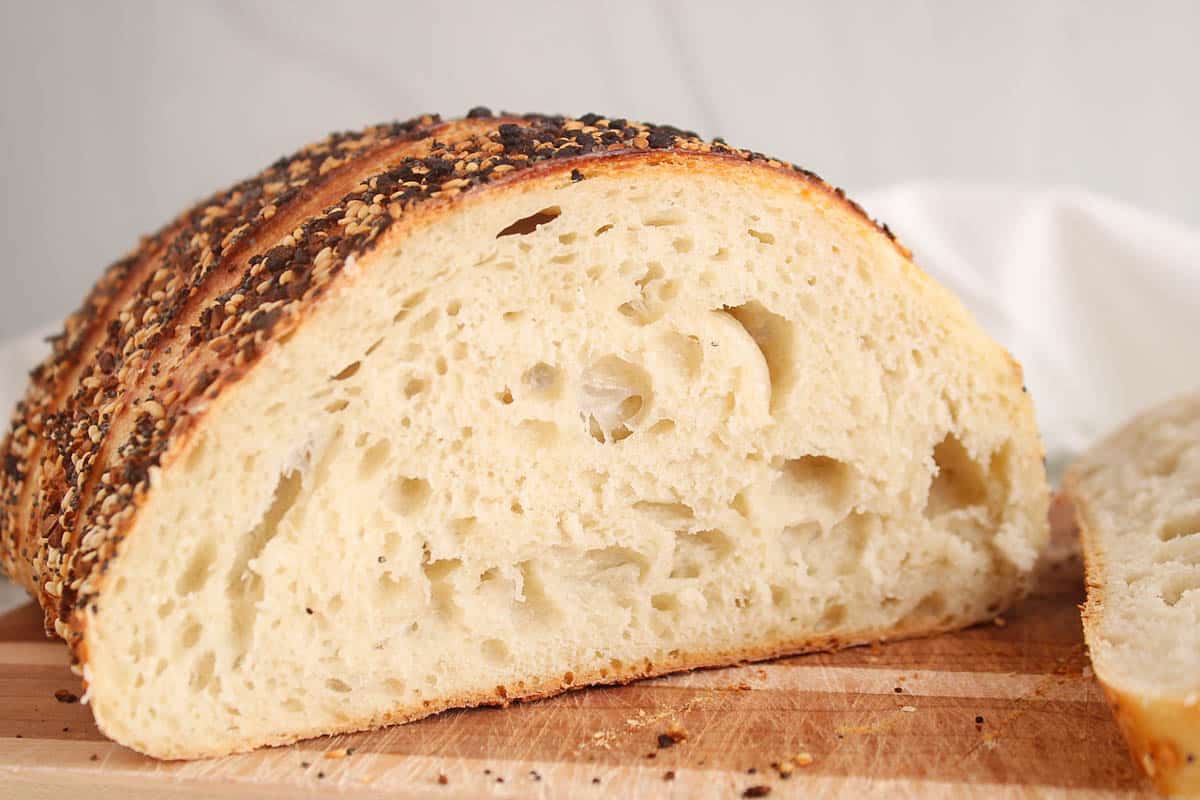
You will need an active sourdough starter to make this recipe, as it is made without any commercial yeast. Making your own sourdough bread takes time and patience, plus a learning curve at first, but the extra effort is well worth it! The reward is a loaf of bread that's healthier and packed with flavor, with a distinctive soft and tender crumb... the kind of homemade bread you cannot find at any store!
This everything bagel seasoned sourdough bread is perfect for breakfast or to make hearty sandwiches with extra character!
Looking for more savory sourdough bread recipes? Check out these sourdough discard pretzels, this caramelized onion sourdough bread and these sourdough discard English muffins!
Let me know if you give it a try! ❤️
Jump to:
❤️ Why you will love this recipe
- Very simple sourdough bread recipe perfect for beginners
- Packed with savory seasonings
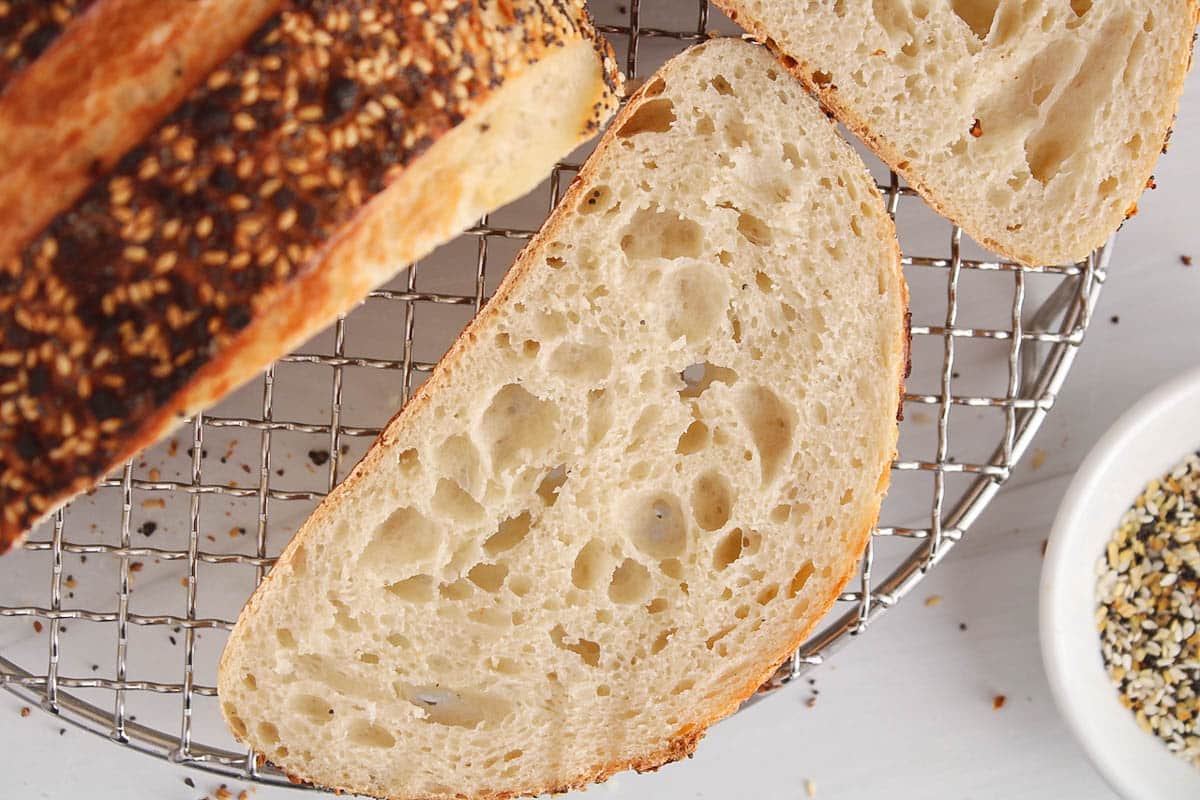
- Chewy yet soft crumb, with an amazing golden crunchy crust
- Perfect for breakfast and sandwiches
🗒 Ingredient notes (+ substitutions)
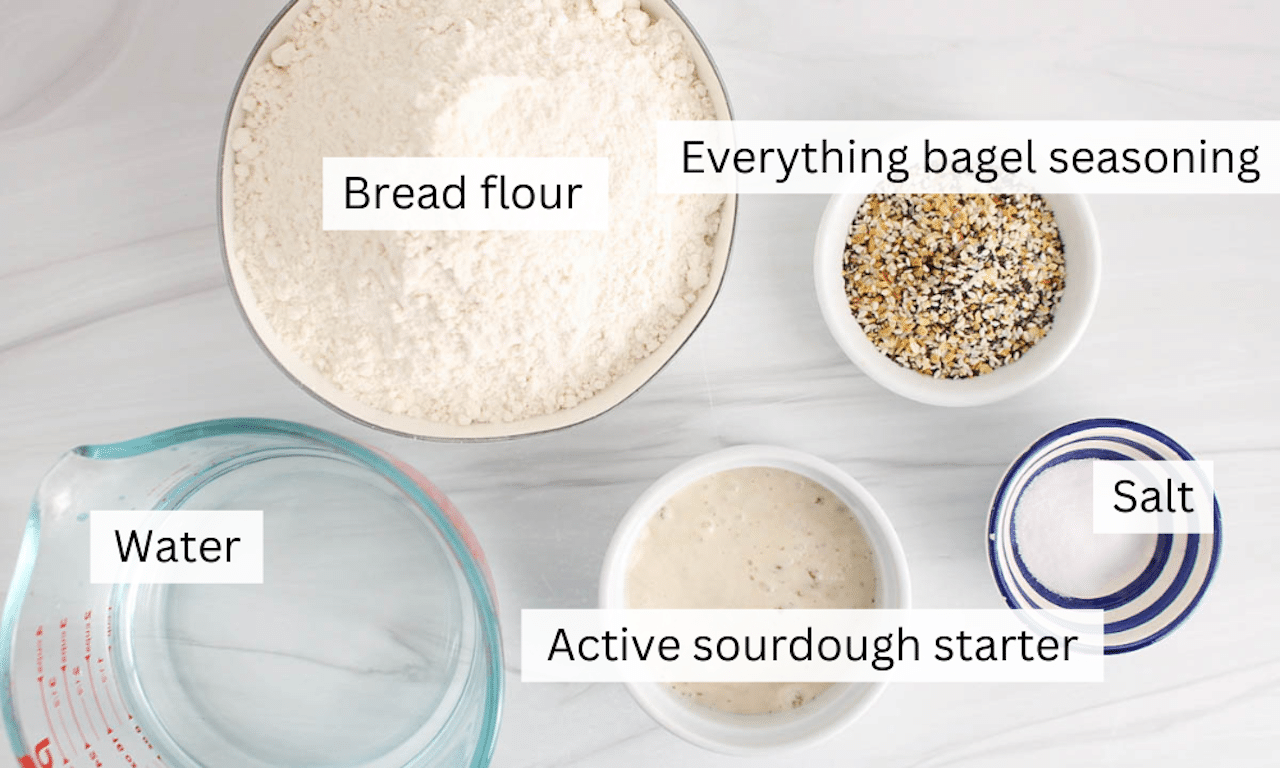
- Sourdough starter: you will need a very active and bubbly 100% hydrated sourdough starter to make this recipe. For your starter to be ready, make sure to feed it 4-8 hours before making the dough. My tip is to feed it late the night before, and make your dough early the next morning, it always works well for me.
- Bread flour: compared to regular all-purpose flour, bread flour has a higher protein content, which encourages the strengthening of the gluten network within the crumb and crust. This is the ideal flour for a chewy, classic sourdough bread interior crumb.
- Water: I usually use warm-ish, or not colder than room temperature water, when making sourdough bread. You could also measure the exact temperature and aim for about 27-32ºC. This helps get the yeast active quicker!
- Everything bagel seasoning: you can use a store-bought mix like I did, or make your own everything bagel seasoning mix. That way, you can control what goes in!
⭐️ Full list of ingredients (+ quantities) down below in the recipe card!
📝 Variations
- Seasonings: I prefer to spread out the seasoning on the crust, but you could also include some in the dough while making the stretches and folds. If you do so, and if your seasoning is salted, then you might want to omit the salt in the ingredient list.
- Inclusions: feel free to add more inclusions in the dough, such as caramelized onion (check out this onion sourdough bread), roasted garlic, fresh herbs such as rosemary or oregano, and more.
🍽 How to make everything bagel sourdough bread
❗️ Before starting, make sure you have a very active and bubbly sourdough starter, or the bread won't rise and the crumb will be gummy! To do so, feed it 4-8 hours before using. The starter is ready when it doubles in height in your jar.
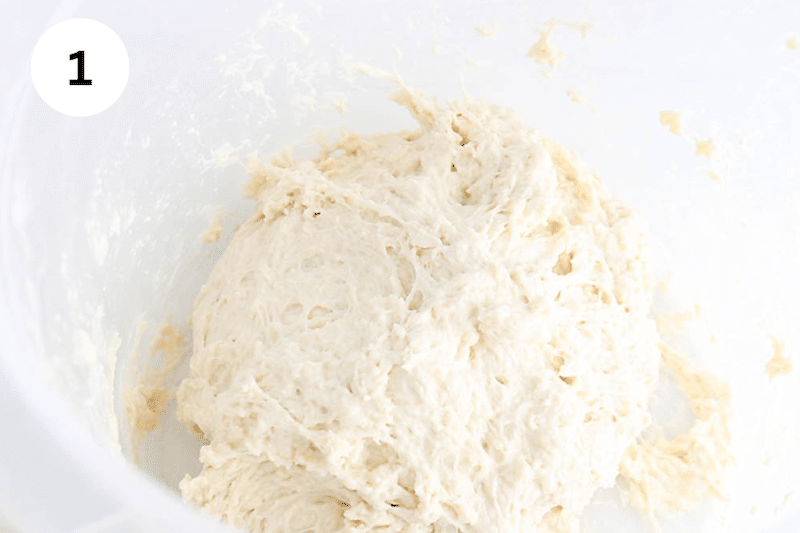
Step 1: In a large mixing bowl or container, add the active sourdough starter and water, then stir to combine. Add the bread flour and salt, and keep mixing until a shaggy dough forms. Cover and let the dough rest for about 20 minutes.
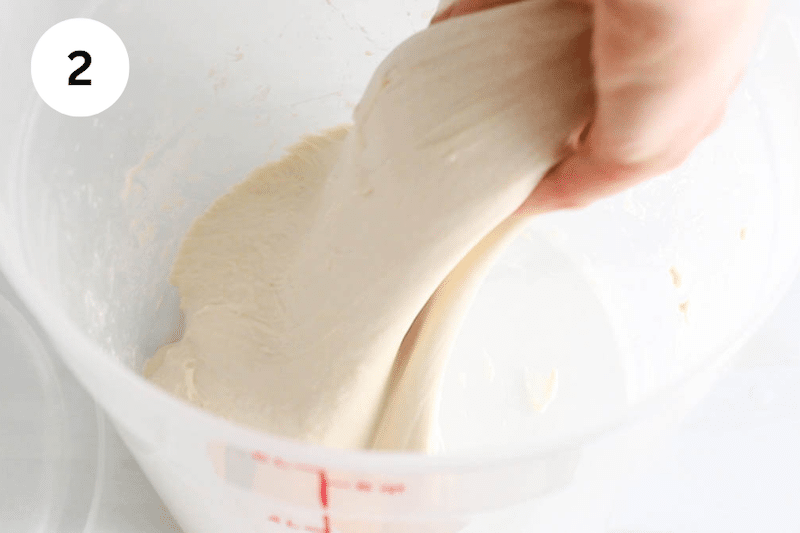
Step 2: Perform stretches and fold right into the bowl every 30 minutes, 3 times, covering the bowl in between. Once done, cover well and let the dough ferment for 5-8 hours (depending on the temperature of your house).
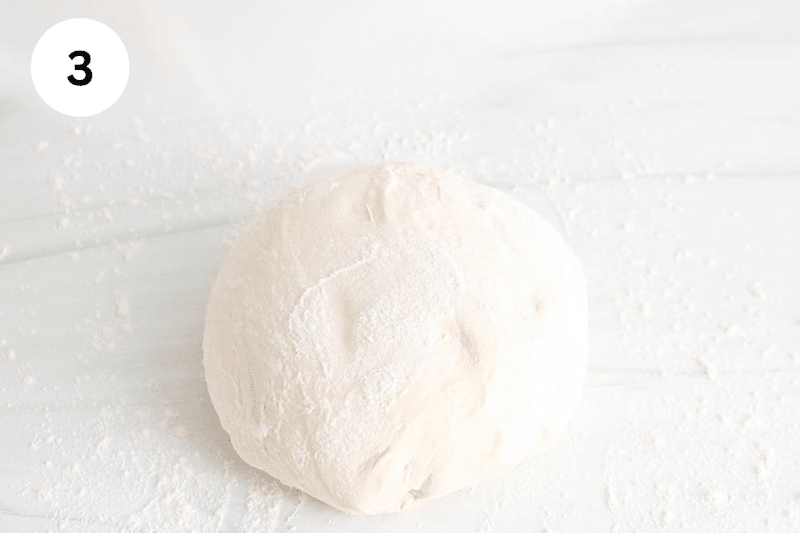
Step 3: Transfer the dough over a very lightly floured clean surface and pre-shape into a ball by grabbing/pulling on the corners of the dough to bring them back to the middle (this should look like a large dumpling!). Flip the ball, cover (you can just flip your bowl over) and let the ball of dough rest for 20 minutes.
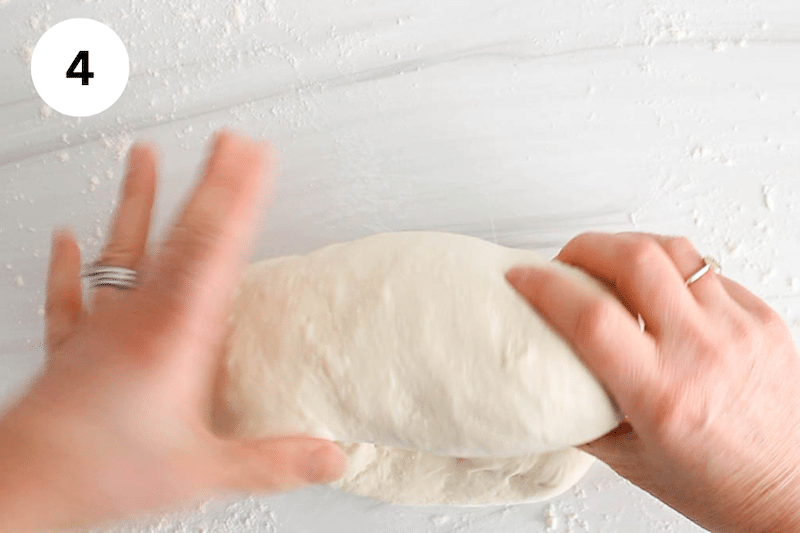
Step 4: Uncover and flip the dough again, then gently stretch the dough into a square/rectangular shape. Fold the top part up to the middle, then fold each side one over the other one, then grab the top part and roll the dough into a tight log. Squeeze the edges together to seal the shape.
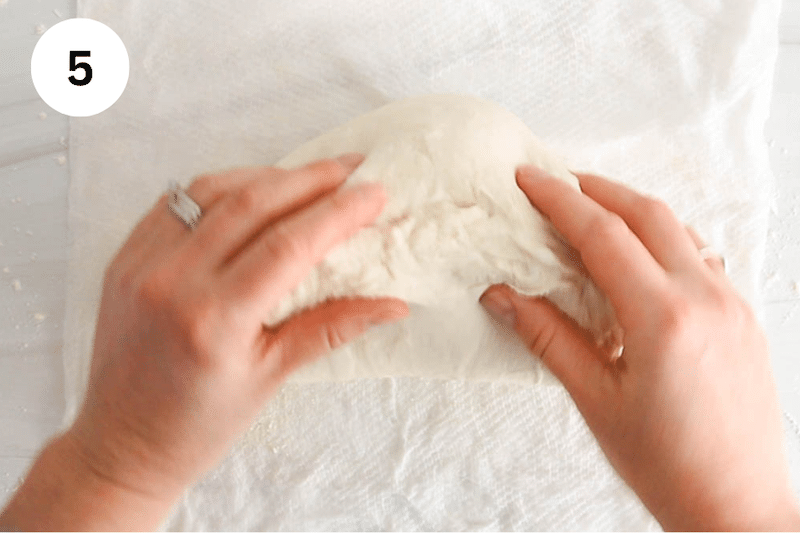
Step 5: Wet a few layers of paper towel and place them on the counter. Also, spread the everything bagel seasoning over a large plate. Grab the dough by pulling on the "top sealed edges" part, transfer the dough over the wet paper towels and gently press/roll the bottom part of the dough on the wet paper towel to cover it with extra moisture (this will help the topping stick to it).
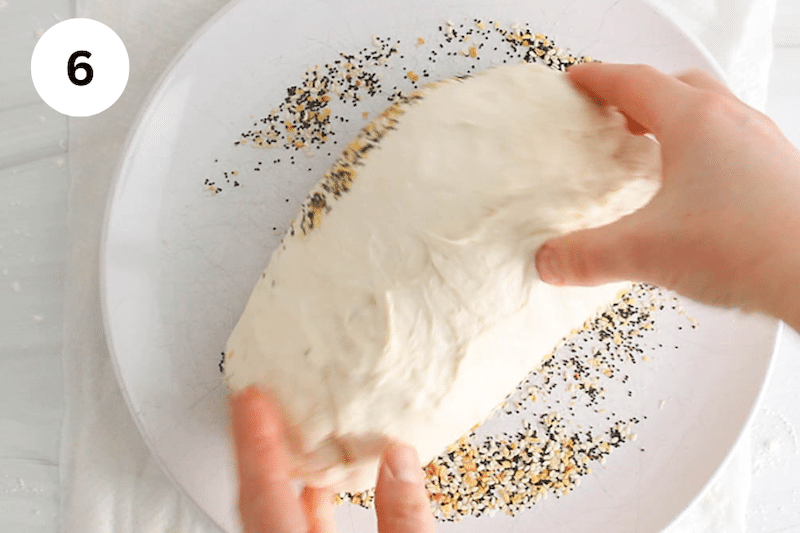
Step 6: Move the dough over the plate with the seasoning and press/roll until the bottom part of the dough is covered.
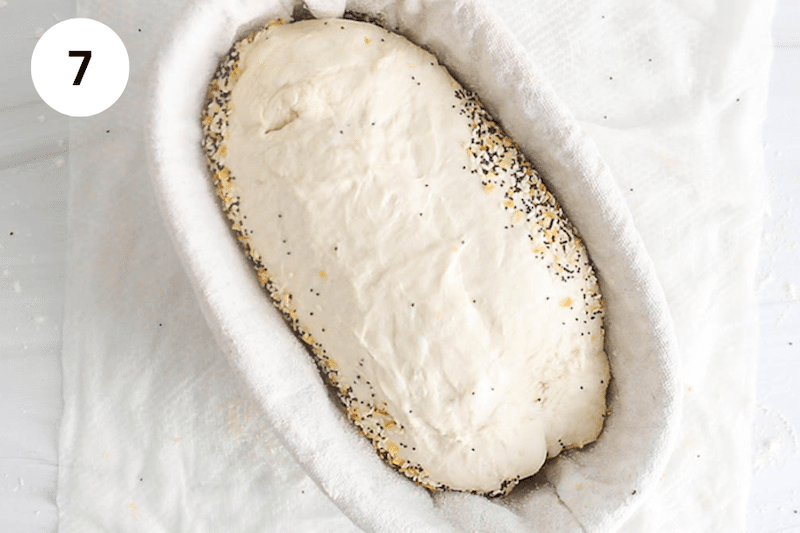
Step 7: Transfer the dough (still with the seasonings on the bottom) to a banneton. Cover and transfer to the fridge overnight (or for at least 2-3 hours).
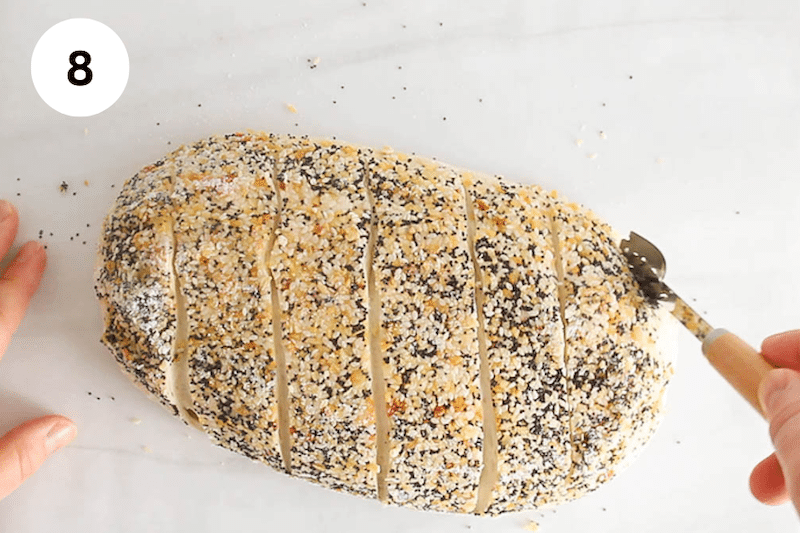
Step 8: At least 30 minutes before baking the bread, transfer a Dutch Oven cast-iron dish with the cover on to your oven and pre-heat to 450ºF until very hot. When ready to bake, take the banneton out of the fridge and flip it over a large square of parchment paper. Score the dough as you wish.
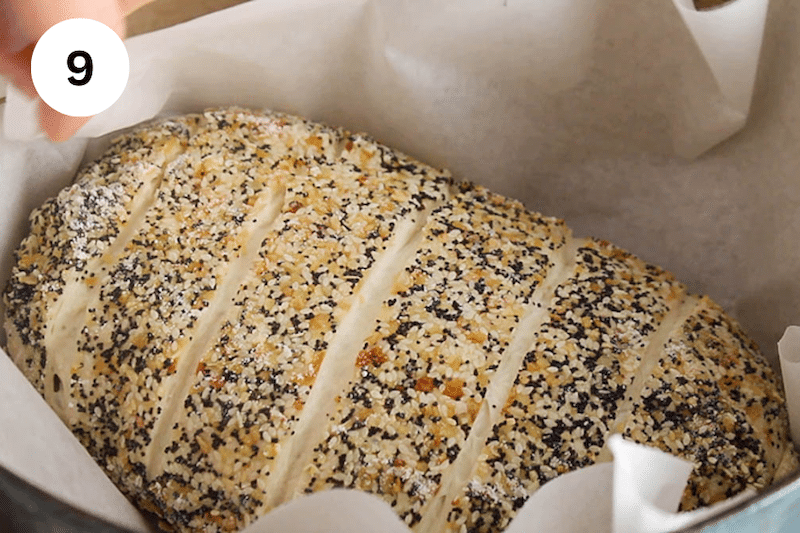
Step 9: Transfer the dough to the hot Dutch oven by pulling on the corner of the paper. You can add a few ice cubes between the parchment paper and the sides of the Dutch oven (this creates more steam). Cover and bake for 30 minutes. Then, uncover and bake for another 5 minutes.
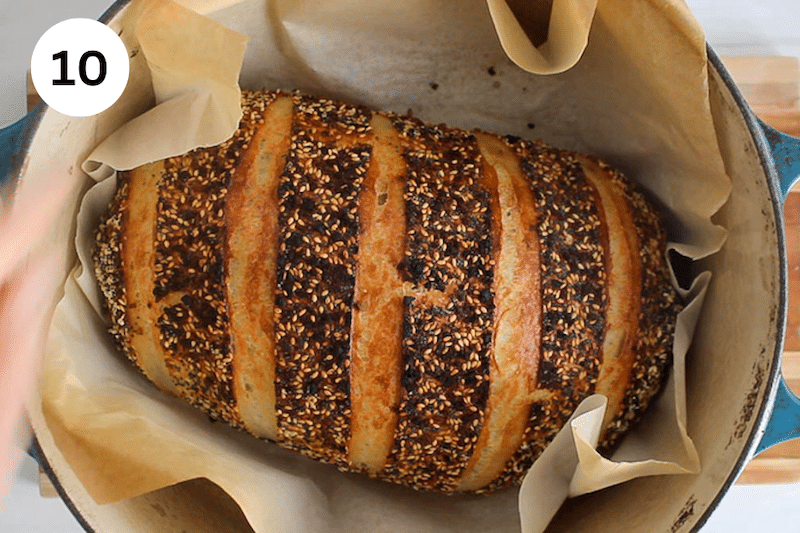
Step 10: Once done baking, take the bread out of the Dutch oven and let the bread cool down completely before slicing (don't slice too quickly or the crumb might be gummy!).
⭐️ Detailed recipe (+ video) down below in the recipe card
💡 Baking tips
- Sourdough starter: Make sure you have a very active and bubbly sourdough starter before you mix the dough ingredients together. Otherwise, the loaf won't ferment as well and the crumb might be dense and gummy. To do so, you have to feed it 4-8 hours prior to making the dough, so plan ahead!
- Fermentation: If you have been making sourdough bread for a while, then you must know that the bulk fermentation time varies depending on the temperature. If your dough is kept in a cozy spot, then it will ferment faster, and if your dough is in a colder area, then you might need to ferment for longer. For me, 6 hours usually is good, but you might need more or less time.
- Same-day loaf: If you want to make this loaf all on the same day, then skip the cold ferment once shaped and let it rest in the proofing basket for about 1-2 hours at room temperature before baking. I find that cold ferment gives a better oven spring and is also easier to score, but this can be a good option if you want bread on the same day.
- Garnishing the loaf: Rolling the dough over a wet towel before pressing the topping over really helps it to stick! Don't skip!
❗️ Storage tips
The bread will stay fresh and the crust very crunchy if you keep the loaf flipped on a cutting board with the sliced part down. I think this is the best way to keep sourdough bread fresh for about 1-2 days at room temperature.
For longer storage, you can place it in an airtight container or bag, but the crust usually softens. Freezing is the best way to keep bread fresh for longer! When freezing it, you can pre-slice the whole loaf to make it easy to grab only one piece at a time. Thaw the bread on the counter for a few hours or directly in the toaster or mini oven.
❓ FAQs
Yes! You can use the open-bake method if you do not have a Dutch oven. Follow this guide on How to Bake Sourdough Bread without a Dutch Oven.
Yes! Simply use the dough hook to mix the dough and keep kneading for a little longer until the dough is smooth to help work out the gluten a little more. If you knead using the mixer, then you can skip the stretches and folds!
🍞 Check out these delicious sourdough bread recipes!


I hope you enjoyed this everything bagel sourdough bread recipe! If you have any questions, please leave them in the comment section below. Your feedback is so helpful!
Let's stay in touch with Instagram, Pinterest and Facebook. Also, don't forget to subscribe to my newsletter to be sure not to miss anything.
📖 Recipe
Everything Bagel Sourdough Bread
Equipment
- Mixing bowl or container (with cover)
- Blade (for scoring)
- Banneton
- Dutch oven (with parchment paper)
Ingredients
- 100 g fed, active and bubbly sourdough starter 100% hydration
- 350 g warm water about room temperature
- 500 g bread flour
- 10 g salt
- 2-3 tablespoon everything bagel seasoning
Instructions
- PREP THE STARTER: about 4-8 hours before you want to make the dough, feed your starter. It is ready to use when it has at least double in height in your jar. I like to feed my starter late at night and start the dough early the next morning.
- MAKE THE DOUGH: in a large mixing bowl or container, add the sourdough starter and water, then stir to combine. Add the bread flour and salt and keep mixing until a shaggy dough forms. Cover and let the dough rest for about 20 minutes.
- STRETCHES AND FOLDS: Perform stretches and fold right into the bowl every 30 minutes, 3 times, covering well in between.
- BULK FERMENTATION: Cover and let the dough ferment for 5-8 hours, depending on the temperature of your house.
- PRE-SHAPE: Transfer the dough over a very lightly floured clean surface and pre-shape into a ball by grabbing/pulling on the corners of the dough to bring them back in the middle (this should look like a large dumpling!). Flip the ball, cover (you can just flip your bowl over) and let the ball of dough rest for 20 minutes.
- SHAPE: Uncover and flip the dough again, then gently stretch the dough into a square/rectangular shape. Fold the top part up to the middle, then fold each side one over the other one, then grab the top part and roll the dough into a tight log. Squeeze the edges together to seal the shape (see video at the bottom of the recipe card).
- GARNISH: Wet a few layers of paper towel and place them on the counter. Also, spread the everything bagel seasoning over a large plate. Grab the dough by pulling on the "top sealed edges" part, transfer the dough over the wet paper towels and gently press/roll the bottom part of the dough on the wet paper towel to cover it with extra moisture (this will help the topping stick to it). Move the dough over the plate with the seasoning and press/roll until the dough is covered.
- COLD PROOF: Transfer the dough (still with the seasonings on the bottom) to a banneton. Cover and transfer to the fridge overnight (or for at least 2-3 hours).
- BAKE: Transfer a Dutch Oven cast-iron dish with the cover on to your oven and pre-heat to 450ºF until very hot (or at least 20-30 minutes). When ready to bake, take the banneton out of the fridge and flip it over a large square of parchment paper. Score the dough, then transfer it to the Dutch oven by pulling on the corner of the paper. You can add a few ice cubes between the parchment paper and the sides of the Dutch oven (it creates more steam). Cover and bake for 30 minutes. Then, uncover and bake for another 5 minutes. Once done baking, transfer to a cooling rack and let the bread cool down completely before slicing.
Video
Notes
- Sourdough starter: Make sure you have a very active and bubbly sourdough starter before you mix the dough ingredients together. Otherwise, the loaf won't ferment as well and the crumb might be dense and gummy. To do so, you have to feed it 4-8 hours prior to making the dough, so plan ahead!
- Fermentation: If you have been making sourdough bread for a while, then you must know that the bulk fermentation time varies depending on the temperature. If your dough is kept in a cozy spot, then it will ferment faster, and if your dough is in a colder area, then you might need to ferment for longer. For me, 6 hours usually is good, but you might need more or less time.
- Same-day loaf: If you want to make this loaf all on the same day, then skip the cold ferment once shaped and let it rest in the proofing basket for about 1-2 hours at room temperature before baking. I find that cold ferment gives a better oven spring and is also easier to score, but this can be a good option if you want bread on the same day.
- Garnishing the loaf: Rolling the dough over a wet towel before pressing the topping over really helps it to stick! Don't skip!
- Nutrition: please note that the nutritional information is an estimate per serving provided for informational purposes only (calculated by software) and accuracy is not guaranteed. Consult with your healthcare provider or a registered dietitian if you need precise nutrition calculations for health reasons.

Anonymous says
Yum! This is a great bread recipe, thanks for the inspiration!
jessica says
😊