
This turmeric sourdough bread is truly amazing. It makes for a stunning loaf that has an eye-catching bright yellow crumb, is packed with antioxidants and carries a mild peppery taste that we just cannot get enough of. Great with soups, stews or to make toast.

Next time you are looking to try something new and unique using your sourdough starter, then give this beautiful turmeric sourdough bread a try.
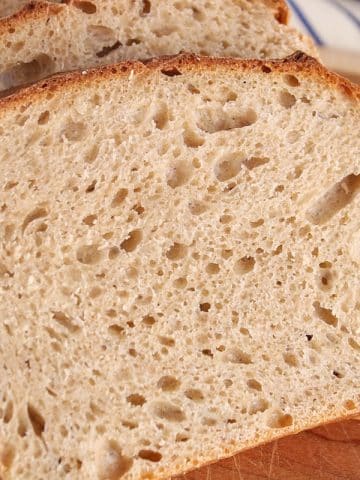
Its stunning bright and almost unreal yellow color will make anyone intrigued and its amazing spiced aroma and light turmeric flavor is simply amazing. The curcumin from the golden spice gives the loaf such a stunning look, but it also packs a lot of extra nutrients, such as antioxidants.
It makes for a delicious savory bread, although its flavor isn't overwhelming at all. It looks like a rustic sourdough loaf but with even more character and appeal.
We loved its tender, soft and airy crumb surrounded by the crispy crust.
I make this turmeric bread whenever I am looking for a side bread for curries or soups. The earthy spiced flavor from this loaf makes any comfort food meal shine even more.
But also, my kids love it toasted until warm and steamy, then smothered with butter and a generous drizzle of maple syrup to contrast with the spices. A combination that seems odd at first sight, but that will make you grab a second slice!
Hope you love it! ❤️

Sourdough bread vs "regular" bread
Homemade sourdough bread takes more work than making a "regular" loaf of bread. The biggest difference is the type of yeast it uses: sourdough rises using natural yeast (or wild yeast) while modern quick-rising bread uses commercial yeast (or dry active yeast).
There are many advantages to choosing sourdough bread, which is why we are seeing such an uptake in the popularity of making your own sourdough bread at home. This popularity is mainly due to all the benefits of using wild yeast from a sourdough starter instead of commercial yeast from the store, such as:
- Low glycemic index: the sugar is processed differently in sourdough recipes, meaning that there is not as much simple sugar available for quick absorption, which can help you regulate your blood sugar.
- Gluten that's easier to digest: thanks to the wild yeast metabolizing the flour into an easily digestible bread.
- Better flavor: another thanks to the natural yeast, but also, to the lactobacilli (acid lactic bacteria) that is responsible for the addictive sour flavor. Sourdough bread simply has an overall more complex flavor profile!
- More satisfying: heartier consistency that sticks to your bones!
- Better storage: sourdough bread tends to spoil a lot slower compared to quick-rising commercial bread.
Why add turmeric to a sourdough bread
Although we love a slice of sweet oatmeal sourdough bread for breakfast or a classic rustic sourdough loaf for toast, there is nothing to beat the uniqueness of that turmeric loaf. You should try this turmeric sourdough for its:
- Color: just as seen in the pictures, the yellow color is vibrant, appetizing and simply hard to resist!
- Taste: you will be able to taste the peppery turmeric flavor, although it does not overpower the whole bread. Instead, the turmeric enhances the natural sweetness of the loaf and makes each bite earthier.
- Health benefits: turmeric has been shown to have powerful anti-inflammatory effects and is a powerful antioxidant that fights free radicals. If consumed regularly, it can limit arthritis symptoms, help prevent cancer and reduce the risk of heart disease.

What you will need
Ingredients
(See below in the recipe card for the measurements)
- Active sourdough starter: here is a guide on how you can make your sourdough starter from scratch. To make the bread, you will have to feed the starter until active and bubbly.
- Bread flour: bread flour is slightly higher in protein compared to regular all-purpose flour, giving the loaf a chewy and fluffy texture by strengthening the gluten network.
- Water: room temperature or slightly warmer water is best for this recipe.
- Turmeric powder: you may adjust how much turmeric powder you want to add to this recipe. I used 1.5 teaspoons, which gave the loaf a deep yellow color.
- Salt and ground black pepper
Equipment and alternatives
- Dutch oven: I highly recommend using a Dutch oven for baking the bread if possible, although it is not essential. This open-bake guide will give you a few Dutch oven alternatives to bake your sourdough!
- Parchment paper: for baking and transferring the bread.
- Bread lame: to score the dough.
- Proofing basket (bannetons): to do the final proof and help create the shape.
- Dough whisk: great, but not essential, tool to mix the dough
- Bowl scraper and dough scraper (or bench scraper): not essential at all, but they help manipulate the dough (see video).
- Large bowl: big enough to allow the dough to double in size and ideally in glass so you can see through.
- Medium/large pan: to help flip the proofed dough on the parchment paper.

Summary of the steps
- Feed the starter until bubbly and active
- Mix/combine the dough (which starts the bulk fermentation)
- 3 sessions of "stretch and fold"
- Resting time during bulk fermentation
- Preshape
- Shape
- Final proof (I did cold fermentation)
- Score and bake
- Cool down and slice
How to make turmeric sourdough bread recipe
(See below in the recipe card for the full recipe)
Make sure to watch the quick video in the recipe card down below!
Levain build: Feed or prep your starter
It is crucial to have a lively, active and bubbly starter to make this recipe. To do that, you must feed your sourdough starter about 4-8 hours before mixing the dough.
You can combine about 25g of your main sourdough starter (or mother starter) with 50g of no-chlorine water + 50g of unbleached flour (bread flour or all-purpose), then let it rest for 4-8 hours in a cozy area.
If the starter doubles in size in your jar after that time, then you can use it (also double-check the float test). The trick is to use your levain at its peak activity before it starts to go back down in the jar.
Mix the dough (+ beginning of bulk fermentation)
In a large mixing bowl, add the active starter, water and salt. Stir until combined.
Then, add the bread flour, turmeric powder and a few cracks of black pepper. Stir to combine until the dough comes together (it will still look shaggy).
Let the bread dough rest in the bowl, covered, for about 20 minutes.
Stretch and fold
Then, stretch and fold the dough 3 times with about 30 minutes of resting time in between each session (keep covered).
Stretch and fold technique: grab the opposite side of the dough in front of you, pull/stretch it up until it gets tight and then fold over the ball of dough in the bowl. Rotate the bowl 90º, then do the same by grabbing the dough also on the opposite side. Keep going around the bowl until the dough feels too tight to stretch. I usually do 4 stretches/fold per session.
Bulk fermentation
Once you are done stretching the dough, then cover well and set aside to ferment in a warm place, which can be anywhere from 5-6 hours to 10-12 hours.
The time needed to ferment widely varies depending on the temperature of your house, but just as a rough estimate, if your house is at a comfortable 68-70º, then you can aim for about 8-12 hours. The dough is done fermenting once it doubles in size.
Make sure to cover the dough tightly while fermenting. For me, I need to use plastic wrap; otherwise, the dough creates a crust over the surface.


Shape
Use your bowl scraper and transfer the dough to a lightly floured clean surface. Pre-shape in a ball and place the bowl upside down over the dough. Let it sit for 20 minutes (bench rest).
Then, dust a little flour over the dough and use your dough scraper to flip the dough on itself.
Shape the dough into a rectangle and then, fold the bottom part over the dough up to the middle. Fold both sides over and then, grab the bottom part and fold/roll the dough all the way to the top.
Final proofing
Use your fingers to seal both edges. Dust your basket and flip your dough seam side up in your basket. Use your fingers to seal the bottom if necessary, cover the basket and do the final proof for 1-3 hours at a cozy room temperature or for 8-10 hours in the fridge.


Score and bake
A little before you want to bake the bread, transfer your Dutch oven into your oven (with the cover on) and preheat to 450º F for at least 30 minutes.
Here is how you can bake sourdough bread without using a Dutch oven.
Then, place a large sheet of parchment paper over your basket and place a cutting board or a large pan over it. Flip the dough using both hands and place on the counter (remove the pan underneath).
Score the top of the dough, then transfer the dough into the Dutch oven by grabbing the corners of the parchment paper. Bake covered for 30 min. Then, uncover and bake for another 5-7 minutes or until the top is nicely golden brown.


Rest and slice
Once the bread is done baking, remove it from the Dutch oven and let it completely cool down before slicing (about 2 hours). This is important and part of the cooking process so you don't end up with a gummy and unpleasant crumb. Be patient!

Baking tips
Making the levain
The levain is a smaller fed sourdough starter portion that you want to use to make the bread.
If after feeding your sourdough starter the levain does not double after 4-8 hours, then repeat the feeding steps (discard-feed-wait). If your levain isn't active enough, your bread won't be as good, so be patient! If you use a sourdough starter from the fridge, then expect to have to feed 2 or 3 times before seeing enough active action to use. You can also add a small portion of rye flour to boost its activity.
Prevent stains
Turmeric stain! It can even stain your counter depending on the material and color, so to be safe, I highly recommend shaping the dough on a large baking sheet to avoid contact with your counter.
Turmeric
You can adjust the amount of turmeric you include in the dough. For an even brighter color, feel free to add 2 teaspoon of turmeric (I used 1.5 tsp), although this would enhance the flavor as well.
Type of flour
I highly recommend using bread flour as described in the recipe. Bread flour is higher in protein, which helps develop a better gluten network for a superior crumb. I used the bread flour from King Arthur.
Length of fermentation
Bulk fermentation is when the wild yeast and acid lactic bacteria metabolize the sugar and gluten in the dough.
The microbiome activity is highly dependent on the temperature of your house: they work faster when it is warmer, but slow down when it is colder. This is great since you can influence the timing of your baking schedule by fermenting in a warm spot or colder environment.
Usually, bulk fermentation takes about 8-12 hours at around 68-72ºF compared to 4-5 hours at 75-80ºF. Again, your dough is ready to shape when it has doubled in size. Using warm (not hot) water to mix the dough can also speed up the fermentation process.
Final proof
I like doing a cold fermentation once the dough is shaped and in the basket or banneton. I find that the loaf spreads less while baking and it makes the scoring easier, too. I did a final proof in the fridge overnight or about 10 hours. You can also speed out the process and do your final proof at room temperature for about 1-3 hours.

Serving suggestions
This bread is amazing served with savory dishes. It makes for a stunning and flavorful side bread to serve with a steamy bowl of soup, rich stew, creamy pasta, spiced curry and more. Or serve simply with a green salad for a light lunch.
We also love it for breakfast! My kids like it toasted with butter and a generous drizzle of maple syrup and my husband and I prefer using it for making avocado toast with tomatoes.
If you have a sharp enough knife and your crumb is tight enough, then you can make thinner slices and use the bread to make sandwiches.

Variations
You can add more to this turmeric sourdough loaf and personalize your bread. Don't be scared of trying new variations, making sourdough bread at home is fun and all about experimenting!
Here are some add-ons you can try:
- Fennel seeds: this is a classic pairing with turmeric, which would work great here. Use about 2 teaspoons and roughly crush/chop them while leaving some seeds intact before using.
- Other spices: you can use a mix of turmeric with yellow curry powder or ground ginger for a nice fragrant variation. Cumin seeds would also work great in this recipe.
- Pumpkin seeds: to add some crunch and variation in texture, you can add about ¼ cup of the seeds.
- Maple syrup: for a mild sweet flavor, you can add 1-2 tablespoons of maple syrup.

Storage tips
Sourdough bread stores better compared to commercial bread, thanks to the higher acidity of the loaf. It is usually safe to store and enjoy the bread for at least a week after baking, and probably longer.
You can keep the loaf of sourdough at room temperature with its sliced surface upside down on the cutting board hiding the crumb. The crust is usually thick enough to help keep the bread from drying too quickly. This works well for 1-2 days.
For longer storage, then I like to transfer it in a large plastic bag. We warm our house with a wood stove, so it tends to be very dry in our kitchen and a sealed bag is often what we need. For easy handling, you can pre-slice the whole loaf and make sure the bag is very well closed. I clean and dry well the bag once done so I can reuse it for the next loaf.
In any case, avoid placing the sourdough in the refrigerator for storage.
You can also pre-slice the bread, place it in a sealable plastic bag or container and freeze for up to 3 months. Pre-slicing first is convenient so you can grab 1-2 slices at a time. You can thaw using a toaster oven.
Check out this guide on how to store sourdough bread for more tips!

More sourdough bread recipes you might like
- Sourdough chocolate bread
- Sourdough discard sandwich bread
- Oatmeal sourdough bread
- Sourdough sandwich rolls
I hope you like this turmeric sourdough bread recipe as much as we do! If you try it, please leave a comment below and rate the recipe to let me know how it was. Your feedback is so helpful!
Let’s stay in touch with Instagram, Pinterest and Facebook. Also, don’t forget to subscribe to my newsletter to be sure not to miss anything.
📖 Recipe

Turmeric sourdough bread
Ingredients
- 100 g active and fed sourdough starter
- 325 g water
- 10 g salt
- 500 g bread flour
- 1.5 teaspoon ground turmeric or 5 grams
- a few cracks of ground black pepper
Instructions
- You will need a bubbly, fed and active sourdough starter to make this recipe. You might need to feed once or twice before using to get good results. See blog post for more information.
Mix the dough
- In a large mixing bowl, add the active sourdough starter, water and salt. Stir well until uniform. Then, add the bread flour, turmeric powder and black pepper. Stir until mostly combined, the dough should be shaggy at this point. Cover and let it rest for about 20 minutes.
Stretch and fold
- Proceed to 2-3 stretch and fold sessions with about 30 minutes of resting time in between. To stretch and fold: grab the dough on the opposite side of the bowl, pull it up until it cannot stretch anymore, then fold it back down on the dough. Rotate the bowl about 90º and repeat with the dough on the opposite side. Keep going until the dough is too tight to stretch (I usually do about 4 stretches per session). Cover, rest for 30 min and repeat 2 times.
Bulk fermentation
- Place the covered bowl of dough in a cozy area and let it ferment for 8-12 hours. The fermentation time varies widely depending on temperature: it ferments faster in a warm spot and slower in a colder area. The dough is ready when it has doubled in size.
Shape
- When the dough is done fermenting, then transfer over a clean and lightly floured surface (you can use a bowl scraper). Pre-shape in a ball, then place the bowl over upside down and let it rest for about 20 min (bench rest).
- Then, lightly cover the surface of the dough and use a dough scraper to flip the dough on itself on the counter. Stretch/shape the dough into a large rectangular. Flip the bottom of the dough up to the middle, then flip both sides and finally, grab the bottom of the dough and roll all the way up. Then use your fingers to seal both edges
Final proof
- Flour your basket or banneton and use a dough scraper to transfer the dough seam side up into your basket. Squeeze the dough on the seam side to help seal it, cover and rest for 1-3 hours in a cozy area or room temperature or for 8-10 hours in the fridge (I did a cold ferment).
Bake
- When almost ready to bake the bread, then transfer your Dutch oven into your oven and preheat the oven to 450º for at least 30 minutes.
- Place a large piece of parchment paper over the dough in your basket and place something solid over it, like a small pan or cutting board. Use both hands to flip the dough on the parchment paper.
- Score the dough and transfer to the preheated Dutch oven by pulling on the sides of the parchment paper.
- Bake covered for 30 minutes. Then, remove the cover and bake for another 5-7 minutes uncovered or until golden brown on top.
- Once done, let the loaf cool down completely (about 2 hours) before slicing. This is important, be patient! Enjoy!
Video
Notes
- If after feeding your sourdough starter the levain does not double after 4-8 hours, then repeat the feeding steps (discard-feed-wait). If your levain isn't active enough, your bread won't be as good, so be patient! If you use a sourdough starter from the fridge, then expect to have to feed 2 or 3 times before seeing enough active action to use. You can also add a small portion of rye flour to boost its activity.
- I highly recommend using bread flour as described in the recipe. Bread flour is higher in protein, which helps develop a better gluten network for a superior crumb. I used the bread flour from King Arthur.
- Bulk fermentation: Fermentation time varies widely depending on the temperature of your house. Usually, bulk fermentation takes about 8-12 hours at around 68-72ºF compared to 4-5 hours at 75-80ºF. Again, your dough is ready to shape when it has doubled in size. Using warm (not hot) water to mix the dough can also speed up the fermentation process.
- Final proof: I like doing a cold fermentation once the dough is shaped and in the basket or banneton. I find that the loaf spreads less while baking and it makes the scoring easier, too. I did a final proof in the fridge overnight or about 10 hours. You can also speed out the process and do your final proof at room temperature for about 1-3 hours.
- This no-Dutch oven sourdough bread guide will show you how to bake your loaf without a Dutch oven.
- There are more tips in the blog post, so be sure to check it out!
- Nutrition: please note that the nutritional information is an estimate per serving provided for informational purposes only (calculated by software) and accuracy is not guaranteed. Consult with your healthcare provider or a registered dietitian if you need precise nutrition calculations for health reasons.


Anonymous says
So good! I was worried the flavor from the turmeric would be overpowering, but it was not. Just a subtle spice taste, and a bright yellow color. And easy to make!! Thanks for the recipe!
jessica says
Great! I'm so glad you liked it! 😊